STEAMsational

Bread Mold Experiment

Categories STEM Activities

We love classic science fair projects, which is why we have always wanted to try the classic bread mold experiment.

Although not as flashy as some of our other classic science fair projects, it was probably more educational than some others.

The students enjoyed seeing how long it took for mold to grow on various forms of bread. There is something really magical about those classic science experiments that have been done for generations! It’s fun to see each new generation learn something new each time they do the experiment.

The bread mold experiment is a classic science fair project for elementary that every kid should try! It's so easy and can be done in just a few days.

Classic Bread Mold Experiment for Kids!

Follow along with these instructions to make your own version of the bread mould experiment!

Bread Mold Experiment Hypothesis Ideas

Kids should come up with their own hypothesis for the mold experiment. Have the children create a hypothesis something like this:

  • Bread with preservatives will take longer to mold
  • Bread in a sunny location will take longer to mold
  • Warm bread will mold faster
  • Wet bread will mold faster
  • Bread will mold faster in the open air than in a plastic bag

Our experiment was simple. We placed bread in various conditions (we had dry dark, dry light, wet, open, and in a closed bag) and Monkey came up with a hypothesis for which piece of bread would mold first.

She predicted it would be the bread we placed in the paper bag in the pantry.

Mold Facts for Science Projects

When doing your bread mold science fair project, here are some fun mold facts for kids to include:

  • Mold is a type of fungus.
  • Mold grows in the shape or multicellular filaments called hyphae.
  • Mold grows from spores that float in the air.
  • There are thousands of types of mold, some good and some bad.
  • A lot of cheese and antibiotics are created with a mold as a base.
  • Mold is usually fuzzy.
  • Mold is considered a single organism.

Follow along with these instructions to make your own version of the bread mould experiment!

Bread Mold Experiment Materials

  • Bread (fresh bread from a bakery will produce much faster results than bread with preservatives)
  • Various bags
  • A permanent marker to label each piece of bread

What You Need for a Science Fair

You’ll want to have these supplies on hand before doing your science fair project. Shop the included Amazon storefronts to make things easier and don’t forget to download the free science fair planning checklist before getting started!

science fair display board example

Science Fair Project Planning

When you’re planning your project, you want to keep everything organized. Click the image below to get my free science fair project checklist so you can start organizing your project from the start.

You may also want to check out this list of science fair project research supplies.

Supplies for a Science Fair Project

There are so many supplies for science fair projects that are individual to each project, but if you want a general list of possible supplies and inspiration for your project, check out my selection of science fair experiment supplies on Amazon.

Supplies for a Science Fair Presentation

Your science fair presentation is important! It should look presentable and eye-catching. Check out this list of my favorite science fair presentation supplies.

Bread Mold Science Fair Project Directions

Divide your bread into as many pieces as you want to test. We used around five pieces.

We only put water on one of our bread pieces, but for the best “scientific” results, you should put water on one piece in a dark place and one in a light place.

In all, we had:

  • Bread in a plastic bag in the light
  • Bread in a plastic bag in the dark
  • Bread in a paper bag in the dark
  • Bread on a paper plate with no bag
  • Wet bread in a plastic bag

My kids thought the dry bread in the paper bag would mold first.

You can take this project further by measuring how much mold is on each piece of bread after a certain number of days.

We just wanted to see which bread piece would mold first, so we did not do any mold measuring.

moldy bread science fair project

Bread Mould Experiment Results

It took about two days for the first mold to show up- which was on the wet piece.

We waited weeks for any mold to show up on any of the other pieces, but it didn’t. This is why we recommend using fresh bread without preservatives.

We finally gave up on waiting for any more mold to grow and threw it out.

Looking for an easy science experiment with dramatic results? The bread mold experiment requires few supplies and is easy for kids of all ages!

The kids were surprised that the wet bread grew mold first, but she thought it was interesting that mold grows faster in damp, warm conditions.

More Science Fair Projects for Kids

20+ Science Fair Projects with LEGOs that are Educational and Fun

Super Fun and Easy Crystal Science Fair Projects

Science Fair Projects for Active Kids Who Need to Move

Science fair projects for kids

Share this project with a friend!

Science Project Ideas

hypothesis of bread mould experiment

Bread Mold Experiment

This biology experiment requires you to gather some background information before starting with the research. Once you know what the organisms called molds are, understanding the activity would be easy.

Bread Mold Experiment

How to Do Mold Bread Experiment

A piece of bread kept under moisture and high temperature develops mold on its surface.

Materials Needed

  • Slice of bread
  • Plastic zipper bag
  • Masking tape
  • Camera (optional)
  • Sprinkle water on the slice of bread.
  • Put the bread in the plastic bag and zip it.
  • Use the tape to secure it further.
  • Write today’s date on the tape with the marker.
  • Leave the bag undisturbed for 7 days in a warm place outside the house.
  • Track the growth of the mold by checking the sample every day. Collect data in the notebook on the size and color of the colony. You can also take a photograph of the bread each day.
  • In the end, throw away the bag with the moldy bread without consumption or inhalation near it.

You Can Also Try Out

  • Instead of just 1 slice, take 3 slices of bread and mark them as A, B and C with the marker on the masking tape. Repeat the process by placing one in the refrigerator, one in a dark room and the last one in a sunny place. Observe and analyze the rate of mold growth under the different conditions of temperature and light.
  • Check the results by keeping one of the variables like temperature constant for the 3 samples mentioned above but altering the type of bread in the different samples.
  • Instead of adding moisture to the 3 slices as indicated in the steps above add different amounts of lemon juice or sugar to the slices. How does that affect the molding on the bread? What happens if you add salt?

For accurate measurements, you can take the help of a plastic grid to check how many squares or cm of it gets covered by the mold. While creating the lab report for your science experiment you can plot that data along the Y-axis and the no. of days along the X-axis on a graph paper.

Mold on Bread Project Video

What is happening a conclusion.

Mold is a fungus that best grows in dark, moist and warm conditions. It feeds on organic matter like bread while decomposing the same. Hence it is harmful to consume the moldy bread or even inhale the smell as mold spores could enter the body in that way. Adding salt inhibits the development whereas sugar enhances the method. Types of bread with high moisture content like rye, oat, Boston and other dark breads mold faster than the drier and denser varieties.

Some Interesting Facts

Many food industries depend on molds to produce food materials like soy sauce, country cured ham, certain types of cheese, etc. They need to know the favorable conditions for fast culture. On the other hand, there are other food industries that take measures to preserve the produce from molds. They utilize the knowledge of the unfavorable situations of infestation.

If you are planning to demonstrate molds growing on bread at a science fair, it is best to perform the experiment beforehand and exhibit the resulting samples for all to see with due explanation of the method adopted.

Leave a Reply Cancel reply

Your email address will not be published. Required fields are marked *

Save my name, email, and website in this browser for the next time I comment.

  • Skip to primary navigation
  • Skip to main content
  • Skip to footer

Science Struck

Science Struck

A Simple Experiment to Grow and Study Bread Mold

Bread mold experiment is a fun science project, where one can observe the growth of a live organism on household bread! Here is a detailed guide that will help you in conducting this experiment.

Like it? Share it!

Bread Mold Experiment

Many people tend to find mold growing on bread disgusting. But, did you know that mold is also one of nature’s cleansers , that breaks down dead organic materials and recycles these nutrients back to the soil, which makes it essential for the ecosystem?

Mold is a type of fungi, which grows on any plant or animal material. Mushrooms and toadstools are a type of fungi. Mold grows on food and other organic matter, and thus, breaks it down into slime by which it extracts nutrient for its growth. This is many times studied in school with a simple experiment.

Bread Mold Project

To study the growth of mold on bread samples every alternate day, for a course of 2 weeks.

If you are allergic to mold, then avoid performing this experiment or use mask and gloves for safety. Seek permission from your parents and teacher before you start with the experiment. Also, after you are done noting down the results of the experiment, dispose off the bags containing moldy bread safely, without opening them.

Here is a list of materials you will need to perform the experiment.

  • 5 slices of bread
  • 5 transparent sealable bags
  • Sticky labels
  • Magnifying glass
  • 5 – 7 cotton swabs
  • A tablespoon
  • Lemon juice/water/apple juice/salt/sugar (at least two of these items are required)

Growing mold can be a simple experiment, and performed on a slice of bread. However, to make it interesting and more detailed you can work on 5 samples of breads rather than just one. So, gather the above equipment and follow the below steps.

  • Take the cotton swabs and run them over areas which have dust, like under a table, bed, or basement.
  • Then rub the dust from cotton swab over the first bread slice.
  • Repeat steps 2 for the other four bread slices.
  • Seal three bread slices inside three transparent sealable bags.
  • Put sticker on the three bags, and write down using a marker on them.
  • On the first sticker write “Sample #1 – Dark Closet”; on second write “Sample #2 – Refrigerator”, and on the third write “Sample #3 – Under Light”.
  • So, keep the first sample in a dark closet, second in a corner of the refrigerator where it doesn’t gets disturbed, and the third one in an area of the house which is most of the time brightly lit.
  • Now, take the remaining two samples. Before you seal them in the bags and mark them with sticker add one of the above mentioned five items to them. For example, on the fourth bread sample you can add some salt, while on the fifth you can add 2 tablespoons of water. Keep these two sample in a place where they don’t get disturbed.

Observations

Wear mask and gloves whenever observing the bread mold samples. Make sure you observe the five bread samples every alternate day at a fixed time of the day, say 2 pm. It is important that you observe them every alternate day without fail, and note down your observations in a table. You can note down their physical appearance like color, shape, amount of growth per day, texture, etc. Another column of your table can be observations of the mold under the magnifying glass. If you want, you can take videos or pictures of the mold every alternate day. This will help in concluding your experiment.

If you are performing this experiment at home, then you might not have access to a microscope. However, when this experiment is performed in school many times the students are asked to observe the mold under a microscope. Note down, the appearance of the mold under the microscope, this can form a part of the observation. Usually, one sees thread like structures on top of which there is a circular shape. Here is a diagram of bread mold in detail.

Bread

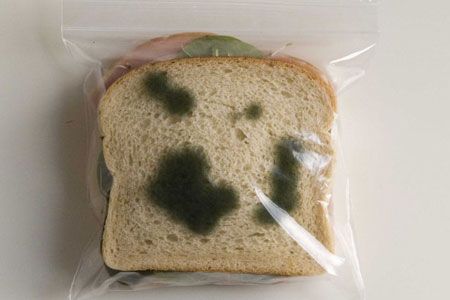
You will observe different conclusions for different samples. The mold which was kept in a warm, dark, and moist condition will grow the best. However, the sample that was in the refrigerator will have a slower growth. Also, substances like salt tend to slow down the growth of bread mold. Conclusion is an important part of the experiment, so make sure you read your observations carefully before you put down the appropriate conclusion of the project. Here are pictures of mold growth on different types of breads.

Bread

Further Experimentation

Once you have tried out this experiment, you can try out further experiments using different materials. You can try growing mold on different types of breads, while maintaining the same temperature. You could also try adding more moisture to the slices of the bread, or use different amounts of lemon juice and sugar on the slices. This way you can vary one element, and note down various observations of the mold growth. So, select a hypothesis and using the appropriate materials perform the experiment again. You can also consider growing mold on soft fruits. Here are pictures of mold growing on a lemon, few strawberries, and a tangerine.

lemon

Interesting Mold Facts

The above experiment will help to study bread mold in detail. Here are some fun facts about mold that will add to your knowledge.

Mold is used by various companies to make food and medicine.

Did you know that mold is added to flavor certain cheeses? You can observe blue-gray veins on a piece of blue cheese, which appear due to the mold added to it.

Cheese

Lichens are formed due to an awesome partnership between fungi and algae.

Lichens

There are over 10,000 species of mold!

Did you know that outdoors, mold is almost everywhere?

To prevent mold from growing on foodstuffs, the food industry spends a lot of money on refrigeration.

I hop you enjoyed reading the above facts on mold. So, gather the equipment necessary for the experiment, perform the experiment, note down the observations every alternate day, and draw the appropriate conclusion. Good luck!

Get Updates Right to Your Inbox

Privacy overview.

Home

Transformations in Matter and Energy Carbon TIME is an NSF-funded partnership led by Michigan State University

Decomposers | Lesson 3 - Investigating Bread Molding

  • Learning Goals
  • Background Information

Talk and Writing

hypothesis of bread mould experiment

Students conduct an investigation to explore what happens when bread molds. They use two process tools in this lesson to record their ideas: The Predictions and Planning Tool and the Evidence-Based Arguments Tool.

Guiding Question

What happens when bread molds?

Activities in this Lesson

  • Activity 3.1: Predictions and Planning about Bread Molding (35 min)
  • Activity 3.2: Observing Bread Molding (60 min over 2 days)
  • Activity 3.3: Evidence-Based Arguments for Bread Molding (50 min)

Decomposers Lesson 3 Unit Map

Target Performances

Activity 3.1: Predictions and Planning about Bread Molding

Students (a) develop hypotheses about how matter moves and changes and how energy changes when bread molds and (b) make predictions about how they can use their investigation tools—digital balances and BTB—to detect movements and changes in matter.

Activity 3.2: Observing Bread Molding

Students record data about changes in mass and BTB when bread molds and reach consensus about patterns in their data.

Activity 3.3: Evidence-Based Arguments for Bread Molding

Students (a) use data from their investigations to develop evidence-based arguments about how matter moves and changes and how energy changes when bread molds, and (b) identify unanswered questions about matter movement and matter and energy change that the data are insufficient to address.

NGSS Performance Expectations

High School

  • Chemical Reactions. HS-PS1-7. Use mathematical representations to support the claim that atoms, and therefore mass, are conserved during a chemical reaction.
  • Matter and Energy in Organisms and Ecosystems. HS-LS1-7. Use a model to illustrate that cellular respiration is a chemical process whereby the bonds of food molecules and oxygen molecules are broken and the bonds in new compounds are formed resulting in a net transfer of energy.

Middle School

  • Chemical Reactions. MS-PS1-2. Analyze and interpret data on the properties of substances before and after the substances interact to determine if a chemical reaction has occurred.

This lesson will be particularly helpful for students struggling to identify that mass of decaying materials is lost to the air. Students conduct an investigation with bread molding and observe an increase in CO 2 in the air using BTB. Students must explain where the carbon atoms in the CO 2 came from.

In this lesson the students return to the guiding question for the unit about how bread molds. We will consistently focus on the idea that understanding carbon-transforming processes involves answering the Three Questions:

  • The Matter Movement Question: Where are molecules moving? (How do molecules move to the location of the chemical change? How do molecules move away from the location of the chemical change?)
  • The Matter Change Question: How are atoms in molecules being rearranged into different molecules? (What molecules are carbon atoms in before and after the chemical change? What other molecules are involved?)
  • The Energy Change Question: What is happening to energy? ( What forms of energy are involved? What energy transformations take place during the chemical change?)

Matter (the Matter Movement and Matter Change Questions). We find that even students who have learned how to balance chemical equations do not appreciate the meaning of the procedure:

  • Conservation of atoms (the Matter Change Question): The numbers of atoms on the left and right side of a chemical equation have to be the same because they are THE SAME ATOMS! A chemical equation just shows how they are being rearranged into new molecules.
  • Conservation of mass (the Matter Movement Question): ALL the mass of any material is in its atoms (and none of the mass is in the bonds, which are just attractive forces between atoms). So, the mass of the products is always the same as the mass of the reactants.

Energy (the Energy Change Question). Chemists, physicists, and biologists have many different conventions for describing and measuring chemical energy. We have a deeper explanation of the conventions used in Carbon TIME units and how they relate to conventions used in different scientific fields in a document called Carbon TIME Content Simplifications . Here are some key points:

  • All bond energies are negative relative to individual atoms. So, during a chemical reaction, it always takes energy (the activation energy) to break bonds. Then, energy is released when new bonds are formed.
  • Whether a chemical reaction releases energy or not depends on the total energy of the reactants, compared with the total energy of the products. So, energy is released when the total bond energy of the products is lower (i.e., more negative relative to individual atoms) than the energy of the reactants.
  • In systems like our atmosphere, where excess oxygen is always present, the most abundant sources of chemical energy are substances that release energy when they are oxidized (e.g., substances with C-C and C-H bonds).

Our research has consistently showed that these ideas are extremely difficult for students who have not formally studied chemistry. We therefore use the convention of twist ties to identify bonds that release energy when they are oxidized.

The investigations in all units will make use of two essential tools:

  • Digital balances. Students can detect movement of atoms (the Matter Movement Question) by measuring differences in mass. In this activity students will be able to observe changes in the combined system that includes both bread and mold.
  • Bromothymol blue (BTB) is an indicator that changes from blue to yellow in response to high levels of CO 2 . Thus, changes in BTB can partially answer the Matter Change Question by detecting whether there is a chemical change that has CO 2 as a reactant or product.

Activity 3.1 is the Predictions and Planning Phase of the instructional model (beginning the climb up the triangle). During this phase, students record their predictions and express ideas about what happens to matter when bread molds. They use the Predictions and Planning Tool to do this.

Activity 3.2 is the Observations Phase of the instructional model (going up the triangle). During this phase, the students record the results of their bread mold investigation and try to identify patterns in their data and observations. The important practices students focus on in this activity are 1) making measurements and observations, 2) recording their data and evidence, and 3) reaching consensus about patterns in results. They use the Observations Worksheet and Class Results Poster to do this.

Activity 3.3 the Evidence-Based Arguments Phase of the instructional model (going up the triangle). During this phase, the students review the data and observations from their investigation of bread molding and develop arguments for what happened during the investigation. In this phase, they also identify unanswered questions: at this point they have collected data and observations about macroscopic scale changes (BTB color change and mass change), but they do not have an argument for what is happening at the atomic-molecular scale (unless they are able to make predictions based on their experiences from the Animals and/or Plants units). They use the Evidence-Based Arguments Tool to record their arguments at this phase.

Key Carbon-Transforming Processes: Digestion, Biosynthesis, and Cellular Respiration

At this stage in the unit, students will complete the inquiry and application sequences for bread molding—they go both up and down the triangle. This means that they will go through the Predictions and Planning Phase, the Observations Phase, and the Evidence-Based Arguments Phase in one lesson. The tables below show specific talk and writing goals for these phases of the unit.

Treat this as elicitation and brainstorming (like the Expressing Ideas Phase), but with more directed questioning.

Three Questions Handout

Elicit a range of student ideas. Press for details. Encourage students to examine, compare, and contrast their ideas with the ideas of other students.

Investigation Video (first half)

Encourage students to provide evidence that supports their predictions. .


Have students document their ideas to revisit later.

Talk and Writing Goals for the Observations Phase

Teacher Talk Strategies That Support This Goal

Curriculum Components That Support This Goal

Help students discuss data and identify patterns.

Class Results Poster

Class Results Spreadsheet

Encourage students to compare their own conclusions about the data and evidence with other groups and other classes.

Class Results Spreadsheet

Class Results Poster

Investigation Video (second half).

Make connections between the observations and the data/evidence.

Have students consider how their predictions and results compare.

Get Your ALL ACCESS Shop Pass here →

Little bins for little hands logo

Bread Mold Experiment

Ever ended up with a loaf of moldy bread at home? It’s not something you want to eat! Instead, grow mold on bread for science, and investigate how moisture, temperature, and air affect mold growth. A fun and easy way to observe the mold life cycle for a hands-on biology experiment for kids .

hypothesis of bread mould experiment

Bread Mold Experiment Variations

Extend the learning by varying your experiment:

Remember only to change one variable for each experiment!

  • Add the same amount of water to different types of bread.
  • Place the same type of bread in light or dark conditions.
  • Use the same type of bread and vary the amount of water on each.
  • Place the same type of bread in a warm area and one in a cold area. Use a thermometer to work out the temperature.
  • Place the same type of bread in a bag and one directly exposed to air.

hypothesis of bread mould experiment

Why not use extra slices of bread and set up this germ science experiment !

  • 2 slices of bread

Instructions:

STEP 1: Label the plastic bags to identify each slice.

TIP: Don’t forget to make one or two predictions before you start. What do you think will happen to each slice?

STEP 2: Add 10 drops of water to one slice and seal.

hypothesis of bread mould experiment

STEP 3: Now add a dry piece of bread to the second bag.

hypothesis of bread mould experiment

STEP 4: Place the slices in a warm, dark place if possible. Observe and record.

Tip: Make observations every 2nd day over the course of 2 weeks depending on how fast the mold is growing.

hypothesis of bread mould experiment

Which piece of bread had the most mold on it? Make sure to read the science of mold to find out why.

hypothesis of bread mould experiment

The Science of Mold

Explores the fascinating world of fungi, like Rhizopus stolonifer, that often grow on bread with simple bread mold experiments. These tiny organisms love damp places so bread, with its moisture, is like a paradise.

Mold spores, everywhere in the air, land on the bread. When it’s warm, and there’s enough air and moisture, these spores grow into visible mold.

They grow quickly using special substances that break down the bread’s sugars. The fuzzy stuff you see on moldy bread is made of tiny threads called hyphae, which join together to form a network called mycelium. This helps the mold take in food from the bread.

Understanding bread mold helps us to see how fungi grows and shows how important conditions like warmth, air, and moisture are for these microorganisms to spread.

Turn It Into A Bread Mold Science Fair Project

Science projects are an excellent tool for older kiddos to show what they know about science! Plus, they can be used in all sorts of environments including classrooms, homeschool, and groups.

Kids can take everything they have learned about using the scientific method , stating a hypothesis, choosing variables , making observations and analyzing and presenting data.

Want to turn this experiment into an awesome science fair project? Check out these helpful resources.

  • Science Project Tips From A Teacher
  • Science Fair Board Ideas
  • Easy Science Fair Projects

Free Printable Science Journal Worksheets

Create a science notebook with these easy-to-use science worksheets to accompany any experiment. Grab your free science process journal pack !

hypothesis of bread mould experiment

More Fun Biology Science Experiments To Try

  • Investigate seed germination with a seed jar .
  • Set up a mini-greenhouse .
  • Make a model of your heart or of your lungs .
  • Learn with animal cell and plant cell coloring sheets .
  • Try this easy strawberry DNA lab.
  • Set up a germ experiment.
  • Explore the life cycles of various animals and plants .
  • Candy DNA and coloring sheet.

hypothesis of bread mould experiment

Helpful Science Resources

Here are a few resources that will help you introduce science more effectively to your kiddos or students. Then you can feel confident yourself when presenting materials. You’ll find helpful free printables throughout.

  • Best Science Practices (as it relates to the scientific method)
  • Science Vocabulary
  • 8 Science Books for Kids
  • All About Scientists
  • Science Supplies List
  • Science Tools for Kids
  • Join us in the Club

Printable Science Projects For Kids

If you’re looking to grab all of our printable science projects in one convenient place plus exclusive worksheets and bonuses like a STEAM Project pack, our Science Project Pack is what you need! Over 300+ Pages!

  • 90+ classic science activities  with journal pages, supply lists, set up and process, and science information.  NEW! Activity-specific observation pages!
  • Best science practices posters  and our original science method process folders for extra alternatives!
  • Be a Collector activities pack  introduces kids to the world of making collections through the eyes of a scientist. What will they collect first?
  • Know the Words Science vocabulary pack  includes flashcards, crosswords, and word searches that illuminate keywords in the experiments!
  • My science journal writing prompts  explore what it means to be a scientist!!
  • Bonus STEAM Project Pack:  Art meets science with doable projects!
  • Bonus Quick Grab Packs for Biology, Earth Science, Chemistry, and Physics

hypothesis of bread mould experiment

Subscribe to receive a free 5-Day STEM Challenge Guide

~ projects to try now ~.

hypothesis of bread mould experiment

Logo for Maricopa Open Digital Press

MOLD GROWTH ON BREAD AND FRUIT

LEARNING OBJECTIVES

Differentiate between fungi and bacteria.

Perform basic mycological culturing.

Identify common household molds based on their macroscopic characteristics.

MCCCD OFFICIAL COURSE COMPETENCIES

Describe and utilize the process of scientific inquiry, its realm, and limitations.

Describe structural characteristics of the major groups of microorganisms.

Explain and demonstrate the mechanisms of microbial growth and metabolism.

You want to grow mold, so you need bread that does not contain preservatives (natural or artificial). Please go the bakery section of the grocery store and look at the ingredients of bread they baked. Find bread that does not contain ascorbic, citric acid, or lactic acid and purchase that. Bread from the bread aisle will contain artificial or natural preservatives and therefore cannot be used in this experiment.

PHOTO REQUIREMENTS

Take a photo with your photo ID during the lab exercises when you see this icon.

cell phone camera

Paste the photos in the Sampling Microbes From The Environment Questions Document.

introduction

Mycology is the study of fungus. Fungi can grow in a wide diversity of environments, but most species require moisture. Fungi grow slower than bacteria, at a lower temperature, and lower pH than most bacteria prefer. Most fungi are unable to ingest food and must absorb nutrients from their surrounding environment. For this reason, fungi must grow directly on or in their nutrient source. Fungi secrete enzymes into their surroundings to help break down their food source and facilitate the absorption process. Fungi are eukaryotic organisms which grow as either unicellular yeast or multicellular mold.

Mold plays an important role in the environment by breaking down and digesting dead organic material. Mold reproduces asexually by producing microscopic spores, similar to seeds produced by plants. Mold spores are ubiquitous; they are found everywhere both indoors and outdoors. Mold spores can easily float through the air and can be carried great distances. The number of mold spores suspended in indoor and outdoor air fluctuates from season to season, day to day, even hour to hour. If mold spores land in a suitable growth environment, they will germinate to produce new mold.

Mold produce multicellular filaments called hyphae.  Hyphal filaments intertwined into a mass, known as mycelia, can be seen macroscopically as fuzzy or hairy colorful growth. Mold absorb food through their extensive network of mycelia. There are three common household molds Rhizopus (white), Aspergillus (black) and Penicillium (green) you are likely to grow.

Photo of Aspergillus

SCIENTIFIC METHOD

Question-What factors encourage mold growth on bread and fruit?

Hypothesis-Absence of light, neutral pH, presence of water and sugar encourage mold growth on bread and fruit.

Experimentation-You will vary light, pH, water, and sugar and observe if mold grows. One bright and dark bag will not have receive a change in pH, water, or sugar.

100 ml graduated cylinder

Resealable plastic bag sandwich or quart size (8)
Lemon or lime juice can be squeezed from fruit or bottled lemon or lime juice (2 teaspoons)
Sugar-white (1/2 cup)
Measuring spoons
Measuring cup
Bread that does not contain artificial or natural preservatives. Check the label, the bread cannot contain ascorbic acid, acetic acid, lactic acid (6 slices cut into 4 pieces per slice for a total of 24 small pieces of bread)

Apple-any variety (1)
Sharp knife
Stove and pot  or microwave and  microwavable bowl
Water-tap is fine
Cell phone or camera to take  photos
Permanent marker
Cup or bowl for surface disinfectant
Bleach

Please watch the brief video guide below and read all instructions carefully before you start the lab exercise.

EXPERIMENT VIDEO GUIDE

1.  Wash your hands thoroughly with soap and water. Dry your hands with paper towel.

2. Prepare surface disinfectant. Using the 100 ml graduated cylinder add 180 ml of tap water to a cup or bowl. Using the 100 ml graduated cylinder now add 20 ml of bleach to the cup or bowl. The surface disinfectant (10% bleach solution) is now ready to use.

3. Disinfect your work surface with the surface disinfectant by applying surface disinfectant with a paper towel, allowing it to remain damp for 2 minutes, and then wiping away any remaining disinfectant with a dry paper towel. Throw the used paper towels in the trash.

4. Use the measuring cup to measure and add 1/4 cup or 4 ounces of water to a pot or microwavable bowl and mix in 1/2 cup of sugar.

5. Gently heat the water-sugar mixture on the stove or in the microwave, stirring occasionally until all of the sugar is dissolved. Use caution when removing the solution from the microwave/stove as it will be hot. Allow the solution to cool to room temperature. The cooled sugar-water solution will be a little thick, like syrup.

6. Use the permanent marker to label the 8 plastic bags:

Bright, Control

Bright, Water

Bright, Sugar

Bright, Lemon or Lime

Dark, Control

Dark, Water

Dark, Sugar

Dark, Lemon or Lime

4. Cut the 6 slices of bread into 24 pieces total (4 pieces from each slice).

7. Cut the apple into 24 slices.

8. Place 3 pieces of bread and 3 slices of apple into each plastic bag.

9. Add 1 teaspoon water to the two bags labeled  Bright, Water and Dark, Water; add 1 teaspoon of the cooled sugar-water solution to the two bags labeled Bright, Sugar and Dark, Sugar add 1 teaspoon of lemon or lime juice to the two bags labeled Bright, Lemon or Lime and Dark, Lemon or Lime. Do not add anything to the bags two labeled Control.

11. Find a well-lit, warm location (e.g. a windowsill or under a lamp) in which to place the 4 bags labeled Bright.

12. Find a dark, warm location (e.g. a warm closet) in which to place the 4 bags labeled Dark.

13. Disinfect your work surface with the surface disinfectant by applying surface disinfectant with a paper towel, allowing it to remain damp for 2 minutes, and then wiping away any remaining disinfectant with a dry paper towel. Throw the used paper towels in the trash. Dispose of left over surface disinfectant by pouring it down the sink and running water for at least 30 seconds. Wash your hands thoroughly with soap and water. Dry your hands with paper towel.

14. Examine the bags every day for 14 days and look for mold formation on the bread and apple pieces. Record the day (1-14) that mold growth was observed in the data table in the Mold Growth on Bread and Fruit Questions document. If no mold growth was observed in 14 days, record no growth. For example, if mold was first observed on the bread in the Dark, Water bag on day 3, record 3 in the data table. If no mold growth was observed in the Control, Dark bag after observing the bag every day for 14 days, record no growth in the data table. On day 14 record the number of pieces of apple (0-3) and the number of pieces of bread (0-3) in each bag that have mold growth in the data table.

AFTER 14 DAY INCUBATION WITH DAILY DATA COLLECTION

5. Do not open the bags when you are finished with the experiment, this will disperse mold spores. Dispose of the sealed bags in the trash and remove the trash bag from your living area.

6. Disinfect your work surface with the surface disinfectant by applying surface disinfectant with a paper towel, allowing it to remain damp for 2 minutes, and then wiping away any remaining disinfectant with a dry paper towel. Throw the used paper towels in the trash. Dispose of left over surface disinfectant by pouring it down the sink and running water for at least 30 seconds.

7. Wash your hands thoroughly with soap and water. Dry your hands with paper towel.

Penicillium

Microbes and Society Lab Exercises Copyright © by Jill Raymond is licensed under a Creative Commons Attribution-NonCommercial 4.0 International License , except where otherwise noted.

Share This Book

  • PRO Courses Guides New Tech Help Pro Expert Videos About wikiHow Pro Upgrade Sign In
  • EDIT Edit this Article
  • EXPLORE Tech Help Pro About Us Random Article Quizzes Request a New Article Community Dashboard This Or That Game Happiness Hub Popular Categories Arts and Entertainment Artwork Books Movies Computers and Electronics Computers Phone Skills Technology Hacks Health Men's Health Mental Health Women's Health Relationships Dating Love Relationship Issues Hobbies and Crafts Crafts Drawing Games Education & Communication Communication Skills Personal Development Studying Personal Care and Style Fashion Hair Care Personal Hygiene Youth Personal Care School Stuff Dating All Categories Arts and Entertainment Finance and Business Home and Garden Relationship Quizzes Cars & Other Vehicles Food and Entertaining Personal Care and Style Sports and Fitness Computers and Electronics Health Pets and Animals Travel Education & Communication Hobbies and Crafts Philosophy and Religion Work World Family Life Holidays and Traditions Relationships Youth
  • Browse Articles
  • Learn Something New
  • Quizzes Hot
  • Happiness Hub
  • This Or That Game
  • Train Your Brain
  • Explore More
  • Support wikiHow
  • About wikiHow
  • Log in / Sign up
  • Education and Communications

How to Make Mold Grow on Bread

Last Updated: September 10, 2024 Fact Checked

This article was co-authored by Meredith Juncker, PhD . Meredith Juncker is a PhD candidate in Biochemistry and Molecular Biology at Louisiana State University Health Sciences Center. Her studies are focused on proteins and neurodegenerative diseases. This article has been fact-checked, ensuring the accuracy of any cited facts and confirming the authority of its sources. This article has been viewed 394,090 times.

Interested in doing a fungi science experiment for school? Making mold grow on bread is not only a great project for the local science fair, it also teaches the ins-and-outs of keeping your bread fresh. With a bit of moisture, a little heat, and a bit of time, you'll have a furry green sandwich that will impress your classmates and gross out your friends.

Growing the Mold

Step 1 Gather the necessary materials.

  • A spray bottle is not entirely necessary, but it is an easy way to evenly coat the bread in a fine mist of water.
  • Fill the spray bottle with water before beginning the experiment.
  • If you don’t have a plastic bag, you can replace it with some other sealable clear container. You want it to be clear so you can observe the mold growth and sealable to contain the mold. An old plastic or glass jar would also work, but you’ll need to throw it away at the end of the experiment.

Step 2 Spray the bread with water.

  • Placing a wet paper towel in the plastic bag with the bread.
  • Sprinkling some water over the top of the piece of bread.
  • Spraying the inside of the bag instead of directly on the bread.

Step 3 Seal the bread in the plastic bag.

  • If you have allergies, you might not want to do this experiment as it may cause you difficulty.

Step 4 Store the bread in a damp, warm area.

  • Mold is a heterotroph, so it does not need sunlight to create food. It gets food from the bread itself in the form of starch which is broken down into smaller sugars. This is why mold often grows in dark, damp areas such as basements. [5] X Research source

Step 5 Observe the mold growth.

  • If you notice the bread has dried out, start over with a wetter piece of bread instead of adding water to the bread. Mold spores can cause allergic reactions and respiratory problems. Some mold contains mycotoxins which can cause neurological problems or even death.

Step 6 Dispose of the bread properly.

  • Wash your hands every time after you have handled the bag.

Experimenting with Different Growth Conditions

Step 1 Make multiple samples of moistened bread.

  • For example, if you want to test 3 different temperatures, make 3 samples.
  • Before each experiment, make some predictions about what will happen. Make a hypothesis about how quickly the mold will grow under each condition. Write down whether you think there will be more or less mold for each condition at the end of the experiment.

Step 2 Vary the amount of moisture on each slice of bread to see how moisture affects mold.

  • Check the samples daily to see if the growth of mold is different between the 3 pieces.

Step 3 Place each bagged bread sample in a different temperature to see how temperature affects mold.

  • Remember, to minimize variability, you will want to use the same amount of water for each piece of bread and store the room temperature sample in the dark, as the samples in the fridge and the freezer will mostly be in darkness. [8] X Research source
  • Check each sample daily and see which piece of bread grows the most mold the fastest.

Step 4 Store each bagged sample in areas with different varying light levels to see how light affects mold.

  • To minimize variability, make sure the temperatures of both environments are the same. Use the same amount of water for each piece of bread as well. If the amount of water and temperature is also different, you won’t know whether the difference in growth rate is due to the light, water, or the temperature.
  • Observe your samples daily to check for differences in growth rate and amount.

Expert Q&A

Meredith Juncker, PhD

  • Wash your hands after finishing the experiment. Thanks Helpful 0 Not Helpful 0
  • Don't open the bag, or let anyone or anything eat it. Thanks Helpful 0 Not Helpful 0
  • Dispose of the bread in a sealed container when finished with the experiment. Thanks Helpful 0 Not Helpful 0

Tips from our Readers

  • If you have allergies, don't do this experiment because it could trigger a reaction for you. Wear a face mask just in case.
  • Keep the moldy bread away from children or pets that may eat it and get sick.
  • If you're using a plastic container, throw the container away as well.

hypothesis of bread mould experiment

  • DO NOT eat the moldy bread, smell it, or even take it out of the bag indoors. The mold releases tiny spores into the air that may trigger allergies and spread the mold onto surfaces and food that you do not want to grow mold on. Thanks Helpful 27 Not Helpful 5
  • The mold on bread can be highly toxic to dogs. Ensure your dog does not eat mouldy bread or come into contact with plates, dishes etc that mouldy bread has touched. Thanks Helpful 19 Not Helpful 7
  • Penicillin grown on bread cannot be used to treat illnesses or infections. Thanks Helpful 18 Not Helpful 7

You Might Also Like

Grow Mold

  • ↑ https://sciencekids.in/bread-mold-science-project/
  • ↑ https://www.steamsational.com/bread-mold-experiment/
  • ↑ https://sciencing.com/breads-mold-faster-8052755.html
  • ↑ https://www.scienceprojectideas.org/bread-mold-experiment.htm

About This Article

Meredith Juncker, PhD

To make mold grow on bread, all you need is a sealable plastic bag and water. Start by dampening a slice of bread so the mold will grow quicker. You can do this by spraying the bread with a bottle, dripping water on it, or placing a wet paper towel on it. After that, seal the damp bread in a plastic bag and store it somewhere warm. The bread will start to get moldy within 7 to 10 days. The fresher your bread is, the faster it will get moldy. This is because fresh bread doesn’t have preservatives like cheaper bread. For more tips from our Science co-author, including how to test different samples of bread, read on! Did this summary help you? Yes No

  • Send fan mail to authors

Reader Success Stories

Manasi Singh

Manasi Singh

Nov 6, 2017

Did this article help you?

hypothesis of bread mould experiment

Jadyn Johnson

Nov 3, 2017

Amelia

Aug 24, 2021

Pratyusha Jain

Pratyusha Jain

Oct 14, 2016

Anonymous

Oct 17, 2023

Do I Have a Dirty Mind Quiz

Featured Articles

Enjoy Your Preteen Years

Trending Articles

The Office Trivia Quiz

Watch Articles

Make French Fries

  • Terms of Use
  • Privacy Policy
  • Do Not Sell or Share My Info
  • Not Selling Info

wikiHow Tech Help Pro:

Level up your tech skills and stay ahead of the curve

hypothesis of bread mould experiment

All Science Fair Projects

1000 science fair projects with complete instructions.

Bread Mold: The Experiment

Bread Mold: The Experiment

Science fair project description.

Complexity level:5
Project cost ($):20
Time required:1 hour to prepare, 8 days for the science project experiment
Material availability:Easily found
Safety concerns:None

Bread mold will grow more quikcly in warm and damp environments.

Bread Mold If a slice of bread were to be left exposed for a few days, ligh- colored patchy or furry growths will be observed on its surface. This growth is called bread mold. Bread mold is actually a kind of fungus. Bread mold spores that are suspended in the air will eventually reach the surface of the bread. Once the spore lands on the bread surface, it will start to consume nutrients and moisture in the bread resulting in growth. The spores of the fungi that grow on the bread are quite commonly found in our surroundings. There are several types of spores and they exist in different colors and shapes. This is why bread spoils very quickly. Some of the common types of fungi that grow on bread are Penicillium, Fusarium, Rhizopus, Aspergillus and Monasus. Once the mold starts to grow on the bread, it should not be eaten. The roots of the mold will grow very deep into the bread and they will grow again even if the mold is scrapped off. The only way to prevent the bread from spoiling for a longer period of time, is to prevent the mold from growing on the bread surface in the first place. That's why refrigerating your bread is a good idea, in order to prevent the bread from getting moldy too quickly.

Scientific Terms

The materials required for this science fair project: - 5 slices of bread - Some water - An airtight plastic bag - A refrigerator - A magnifying glass

1. For this science fair project, the independent variable is the environment in which the slices of bread are kept. The dependent variable is the rate of growth of bread mold. This is determined by inspecting the bread with a magnifying glass. The constants (control variables) are the room temperature, the age of the bread and the handling of the bread. 2. The 5 slices of bread are prepared as follows: a. a few drops of water  are placed on the first  slice of bread and it is kept in a dark and damp place, b. the second slice of bread is kept unattended under normal room conditions, c. the third slice of bread is kept under the hot sun, d. the fourth slice of bread is kept inside an air tight plastic bag, e. the fifth slice of bread  is kept in a refrigerator. 3. The bread slices are observed daily to ascertain if there  are any signs of mold growing. The results are recorded in the table below.

It is observed that the first slice of bread with a few drops of water and which was kept in the dark place, was the first to exhibit signs of mold. The fifth bread slice that was kept in the refrigerator, took the longest for the mold to appear.

Environment

Day 1

Day 2

Day 3

Day 4

Day 5

Day 6

Day 7

Day 8

Wet bread in dark area

X

Y

Y

Y

Y

Y

Y

Y

Bread in room condition

X

X

X

Y

Y

Y

Y

Y

Bread kept under the sun

X

X

X

X

X

Y

Y

Y

Bread in airtight bag

X

X

X

X

X

Y

Y

Y

Bread in refrigerator

X

X

X

X

X

X

X

Y

The hypothesis that  bread mold will grow more quickly in warm and damp environments is proven to be true. Mold will grow quickly on bread in humid and warm conditions. Bread should be kept in dark, dry and cool places for it to last longer. Bread can also last longer if stored in the fridge or in airtight containers. Adding a small amount of edible chemicals like acetic acid or prop-ionic acid to the bread will also help to preserve it longer.  Mold is a nuisance when it comes to storing food, but it has its usefulness too. Molds help in the decomposing of decaying animals and plants. Penicillium is used produce medication. 

Also consider

This science fair project may be repeated, this time, by baking the bread at high temperatures again before starting the science fair project? Modify the science project experiment,  using different types of food like biscuits or cooked rice.

Bread mold - http://ezinearticles.com/?Bread-Mold&id=405845 Bread storage to prevent spoilage - http://www.ehow.com/way_5746731_bread-storage-prevent-spoilage.html

Related video

Related Science Fair Project Ideas

Preserving Bread with Fruit

Choose an Account to Log In

Roly

Notifications

Science project, which bread molds the fastest.

hypothesis of bread mould experiment

Many food lovers are getting worried about the amount of preservatives and chemicals found in their everyday meals, now that these additives have been proved to be harmful to our health. In order to stay fresh on the shelves for so long, many commercial breads contain these ingredients. This experiment will explore the rate of mold growth on different kinds of breads, and the affect that preservatives have on them.

Do different types of grain affect the rate of mold growth? How do food preservatives affect mold growth?

  • Five plates
  • Slice of white bread
  • Slice of wheat bread
  • Slice of rye bread
  • Slice of bread made from rice flour
  • Slice of homemade bread (like this )
  • Create a chart in your journal with the breads and the ingredients in each.
  • Place a slice of bread on its own plate, and sprinkle a teaspoon of water on each sample. Make sure the slices are equally damp, but not soggy.
  • Place all five plates in a warm, dark place where they won’t be bothered (like an empty cabinet) and keep some distance between the samples. Don’t let the plates touch.
  • Take a photo of each sample on its first day.
  • Leave the samples overnight.
  • The next day, note any changes in your science journal, and take another photo of each sample.
  • Then sprinkle on some more water to keep the samples moist.
  • Repeat steps 6 and 7 for one week. Remember to take careful notes about the mold, like how much mold is growing, and what color and shape it is.
  • After taking your last photos on day seven, throw away all your bread samples.

Related learning resources

Add to collection, create new collection, new collection, new collection>, sign up to start collecting.

Bookmark this to easily find it later. Then send your curated collection to your children, or put together your own custom lesson plan.

Logo

  • Free Resources
  • Project Search
  • Featured Projects
  • Member Benefits

1059 Main Avenue, Clifton, NJ 07011

The most valuable resources for teachers and students

logo

(973) 777 - 3113

[email protected]

1059 Main Avenue

Clifton, NJ 07011

07:30 - 19:00

Monday to Friday

123 456 789

[email protected]

Goldsmith Hall

New York, NY 90210

Logo

  • Why We’re Unique

Factors affecting the the growth of molds or yeast

Introduction: (initial observation).

Molds are varieties of multi-cellular organisms that grow on bread, fruits, cheese and almost any other dead organic matter.

Learning about the factors that affect the growth of mold and yeast can help us to control reproduction of these micro organisms.

hypothesis of bread mould experiment

This project guide contains information that you need in order to start your project. If you have any questions or need more support about this project, click on the “Ask Question” button on the top of this page to send me a message.

If you are new in doing science project, click on “How to Start” in the main page. There you will find helpful links that describe different types of science projects, scientific method, variables, hypothesis, graph, abstract and all other general basics that you need to know.

Project advisor

What you will see in this project is just an example of information and experiments about growing mold and Yeast. You need to read this information and then come up with your own procedures. First you will decide which one you want to study on. Mold is an easy one, but you may select yeast as well. The next step is growing the organism that you select in order to make yourself familiar with what is involved. In your final step, you will repeat growth experiment at different conditions of light, moisture, and temperature. Finally, you will compare the results and draw a conclusion.

Information Gathering:

Find out about mold, yeast or other types of fungi, how they grow, and where they grow. Read books, magazines or ask professionals who might know in order to learn about different types of fungi. Keep track of where you got your information from.

Click here to see a sample project related to mold growth.

Mold if a fungi. Click here for a good source of information about fungi.

TRY GROWING YOUR OWN MOLDS IN A MOIST CHAMBER!!!

The material that supports the growth of a fungus is called its substrate. A commercially prepared medium like potato agar is one kind of substrate, but any organic material can be used.

The simplest method of growing molds is to put a substrate like bread in a moist chamber. The substrate provides nutrients, and the chamber maintains the high humidity that favors the growth of fungi. Placing a slice of bread, fruit or vegetable, or a leaf in a plastic sandwich bag is a simple way to use this method. The small plastic bag must have a tie, a fold-over top or another way of sealing it. Mold growth should be visible after 3 to 5 days. If you want to try this experiment, follow the directions below.

You will need the following items:

  • Substrate material
  • Sandwich bags with a tie, fold top or “zip lock”.
  • A marker to label the bags.
  • Damp, NOT WET, paper towels.

Making the moist chambers

  • Label the bags with a number so you can tell them apart.
  • Place a damp towel in each bag.
  • Place a slice of bread or other substrate on top of the damp towel.
  • Seal the bags.
  • Record the substrate put in each bag.
  • Place the bags in a warm area out of direct sunlight where they will not be disturbed.
  • Check the bags each day. Fungal growth should be visible in 3 to 5 days. Fungi are fuzzy or hairy and may be green, white, black, yellow, etc. Bacterial colonies are shiny or slimy and may also be different colors.
  • Record the number, color, and size of the fungal colonies. One very fast growing fungus, the Galloping Grey Ghost (Rhizopus stolonifer), may completely cover bread in just a couple of days.

Questions to help design experiments

  • Does the amount of light affect the growth of mold?
  • Does moisture affect the mold growth?
  • Does temperature affect the mold growth?
  • Are there differences in the numbers and kinds of fungi growing on different kinds of bread?
  • Does preservative in some bread affect the numbers and kinds of molds?
  • Are there differences in the numbers and kinds of fungi growing on bread compared to carrots?

TRY GROWING YOUR OWN YEAST !!!

The yeasts are one very important group of fungi. The common yeast used in baking bread grows very fast. You can complete an experiment in two days! The basic idea in this method is to measure the amount of carbon dioxide (CO2) released during the growth of yeast. The growth of the yeast stops when one of the nutrients required by the yeast is gone, or when the liquid gets too acid (low pH) and kills the yeast. If you want to try this experiment, follow the directions below.

  • A teaspoon measure
  • A permanent marker
  • Active dry yeast (used in baking bread–do not use quick-rising varieties.) This yeast is available in jars if you are planning on doing a large experiment.
  • Bottled soda pop or water in equal amounts. Different items contain different ounces per container. Shake each soda bottle and let the foam settle before opening, or open and allow to go flat overnight.
  • Identical round, thin latex balloons–“water balloons” are slow to expand. Non-Mylar® “helium-quality” balloons give good results.

hypothesis of bread mould experiment

Directions for growing yeast

  • Label each bottle with a number to keep track of what each one contains–control, treatment and contents, so that you can tell bottles containing the same solution (replicates) apart. Color is not a reliable means of identification–the caramel color used in cola is a carbohydrate and the yeast can eat it.
  • Put a teaspoon of dried yeast in each bottle.
  • Seal the bottles tightly and shake the bottle.
  • Remove the lids and stretch a balloon over the mouth of each bottle. The balloon should fit very tightly so that the carbon dioxide does not leak into the air.
  • Place each container in a warm area out of direct sunlight (top of refrigerator or clothes dryer) where they will not be disturbed.
  • Record the diameters of the balloons, time since start of experiment, etc. for each bottle. One good method of measurement is to wrap a string around each bottle at its widest point, and then measure the length of the wrapped string against a yardstick. Record any other things you see happen. Did the color change? Did one balloon have a hole in it?
  • Calculate the average diameter of the balloons in each treatment and the controls. The average is calculated by adding all the diameters of all the balloons in a treatment then dividing by the number of balloons in the treatment.
  • Compare the results (average balloon diameters) of the experiment.
  • A graph of the averages might help show your results.
  • Is the average of the treatments larger than the average of the controls?
  • Is the average of one treatment larger than the averages of the other treatments?
  • Is carbonated water a better control than non-carbonated water in experiments with different kinds of soda pop?
  • Is the amount of sugar used in a bottle related to the amount of carbon dioxide released into the balloon? Hint: graph sugar concentration versus average balloon size.

An Alternative to the Balloon Method for Measuring Yeast Respiration

The apparatus shown in the picture permits more accurate measurement of yeast respiration than the balloon approach. The carbon dioxide respired by the yeast is trapped in an upside down graduated cylinder. The milliliters marked on the graduated cylinder let you read directly the amount of carbon dioxide trapped.

You will need:

hypothesis of bread mould experiment

  • graduated cylinder (100 ml shown).
  • beaker or bowl.
  • rubber or plastic tubing.
  • one hole rubber stopper. A number 3 stopper fits most 1 liter plastic soda bottles.
  • short glass or plastic tube. A medicine dropper or piece of a 1 ml plastic pipette might work. The tube should not touch the liquid culture in the flask or bottle.
  • Erlenmeyer flask or soda bottle (500 ml flask shown).

Directions for assembly:

  • Buy one-hole rubber stoppers that fit your bottles or flasks. Your teacher may be able to help or hobby stores that sell chemistry sets often have the supplies you will need.
  • Insert a short piece of glass or plastic tubing in the hole in the stopper. It will be easier to insert the tube if you put salad oil on the outside of the tube. BE CAREFUL. If you break the glass tube you may cut yourself.
  • Measure and cut a piece of rubber tubing long enough to reach from the flask to the lower part of the graduated cylinder.
  • Slide one end of the rubber tubing over the tube in the rubber stopper.
  • Fill the beaker or bowl with water.
  • Fill the graduated cylinder all the way to the top with water.
  • Cover the top of the graduated cylinder with your hand and quickly turn it over and put it in the beaker filled with water.
  • Remove your hand. There should not be any air in the graduated cylinder. If there is a small amount of air, record the amount (ml). You will need to subtract this amount from the total in the cylinder when you take respiration measurements.
  • Fill the flask or bottle with your liquid yeast culture.
  • Insert stopper in the flask or bottle.
  • Insert the end of the rubber tube in the graduated cylinder. Do not lift the end of the graduated cylinder out of the bowl or it will fill with air.

Question/ Purpose:

What do you want to find out? Write a statement that describes what you want to do. Use your observations and questions to write the statement.

Temperature, moisture and light are among the factors that may be studied for their effect on the growth of mold, yeast, or any other fungi.

These are samples of how you may define a question or purpose for your project.

The purpose of this project is to identify the effect of light on the growth of mold.

Note that instead of light you may choose other factor and modify your experiments accordingly. You can also substitute mold with yeast. This is another example:

The purpose of this project is to find out “How does the type of substrate affect the growth of yeast?”.

Substrate is a combination of food and growth media. Substrates such as water, sugar water, starch solution, flat soda,.. may be compared.

You may be much more specific and have a purpose like this:

Does yeast need air to grow?

Identify Variables:

When you think you know what variables may be involved, think about ways to change one at a time. If you change more than one at a time, you will not know what variable is causing your observation. Sometimes variables are linked and work together to cause something. At first, try to choose variables that you think act independently of each other.

This is a sample of how you define the variables:

  • Independent variable (also known as manipulated variable) is light.
  • Dependent variable (also known as responding variable) is the mold growth.
  • Controlled variables are temperature, substrate type (type of bread), moisture.
  • Constants are all other experiment conditions such as the source of bread, type and size of the plastic bag.

You may want to study other factors (Independent variables) as well. Just make sure that the independent variables must be tested ONE at a time.

Hypothesis:

Based on your gathered information, make an educated guess about what types of things affect the system you are working with. Identifying variables is necessary before you can make a hypothesis. This is a sample of hypothesis:

My hypothesis is that molds grow best in a dark environment. Possibly light or certain radiations in the light spectrum can slow down or prevent mold growth.

This hypothesis is based on my personal observation on where mold is usually found at home.

Experiment Design:

Design an experiment to test each hypothesis. Make a step-by-step list of what you will do to answer each question. This list is called an experimental procedure. For an experiment to give answers you can trust, it must have a “control.” A control is an additional experimental trial or run. It is a separate experiment, done exactly like the others. The only difference is that no experimental variables are changed. A control is a neutral “reference point” for comparison that allows you to see what changing a variable does by comparing it to not changing anything. Dependable controls are sometimes very hard to develop. They can be the hardest part of a project. Without a control you cannot be sure that changing the variable causes your observations. A series of experiments that includes a control is called a “controlled experiment.”

For example, in one experiment you may study the effect of light on growing mold. You may take three pieces of bread in three identical plastic bags and keep one of them at normal light to be your control and place two others, one in a dark place, and the other exposed to more than normal light. For a more reliable result you may use more samples. For example you may place 5 samples in a dark place, 5 samples in normal room light and 5 samples under a strong light source such as fluorescent light.

About Mold Experiment

As you know, we keep food in refrigerators so it will last longer. But still, sometimes you open a bag of bread or a jar of spaghetti sauce and what do you find? Mold!!

Ever wonder exactly what mold is? And how did it get there? And why sometimes it’s green and other times black or white? Did you know mold is a fungus and is alive and growing?

In this experiment, you’ll find out all about those colorful, fuzzy fungi by growing your own crop. Print out these pages and follow the directions to do this experiment at home. When you’re done, try answering the questions below.

Note: This is a long-term activity. It will take several days for the mold to grow. The first day should take you about 30 minutes to one hour to prepare everything. For safety reasons, don’t eat or drink while doing this experiment. And don’t taste or eat any of the materials used in this activity.

You’ll Need:

  • 3 eye droppers
  • small cup filled with 4 teaspoons or 20 mL of sugar water (see directions for preparing sugar water below)
  • small cup filled with 4 teaspoons or 20 mL lemon juice
  • small cup filled with 4 teaspoons or 20 mL tap water
  • 4 slices of plain white bread*
  • 4 slices of assorted bread, such as wheat, rye, sourdough, etc.*
  • 8 resealable plastic sandwich bags
  • masking tape

*It’s best if you use newly bought, fresh bread to make this experiment as accurate as possible.

Preparing sugar water

Note: Young people who don’t have experience operating a stove or microwave oven should get help and supervision from an adult. Parents or supervisors of young children may consider doing this step themselves.

Microwave: Stir 1/4 cup of sugar into 1/4 cup of water in a microwave-safe container and heat at one-minute intervals until sugar dissolves. Water will not need to reach boiling. Use potholders or oven mitts to handle container. Allow the mixture to cool for about five minutes before using.

Stovetop: Stir 1/4 cup of sugar into 1/4 cup of water in a small saucepan. Heat over medium heat until the sugar is dissolved. Use potholders to handle hot saucepan. Allow the mixture to cool for about five minutes before using.

What To Do:

1. Using masking tape and marker, make labels for four sandwich bags. Label the first bag “Dry White Bread.” Label the second “Water on White Bread,” the third “Lemon Juice on White Bread,” and the fourth “Sugar Water on White Bread.”

2. Wash your hands. Place a slice of white bread in the bag labeled “Dry White Bread” and seal the bag. Using one eye dropper, sprinkle 20 drops of tap water on another slice of white bread. (Don’t overdo it; the bread should be moist, not wet. If your bread is dripping, you’ve definitely done way too much. Throw away that slice and try again.) Place the moist bread in the bag marked “Water on White Bread” and seal the bag. Using a different eye dropper, sprinkle 20 drops of lemon juice on another slice of white bread and put it in the bag marked “Lemon Juice on White Bread” and seal the bag. Using your third eye dropper, sprinkle 20 drops of sugar water on the last slice of white bread and place it in the bag labeled “Sugar Water on White Bread” and seal. Try to keep your fingers off moist spots when handling each slice of bread.

3. Repeat steps 1 and 2, but this time use a different kind of bread in the remaining four bags. Your labels should note what kind of bread you’re using. Wash your hands when you’re done.

4. Make sure all of your bags are tightly sealed. Place all eight bags in a dark, warm place (about 86 degrees Fahrenheit, 30 degrees Celsius). Check with your parents or supervisor about where to store the bags. Check the bags each day for two weeks and record the results in a notebook. You may wish to draw or take pictures of the bread slices. Don’t open the bags!

5. Make a graph recording the total growth of mold on each of the four white bread slices at the end of two weeks (see sample graph on right). Make a similar graph for the other four bread slices. Compare the results. At the end of the two weeks, throw out all the bags unopened.

hypothesis of bread mould experiment

  • From this activity can you tell what helps mold to grow best?
  • Does it matter what kind of bread you use?
  • What causes the different colors you see?
  • What would happen if you left the bags in a well-lit place instead of a dark place?
  • What would happen if you changed the temperature?

Answer 1: Unless you used bread that had been sitting out for many days, you probably didn’t get much or any mold growth on the dry bread. Clearly, water is important for the growth of mold. The mold grew best on bread sprinkled with sugar water because the sugar serves as food for the fungi. The more food that’s available, the more fungi cells can grow. The mold also grew pretty well on the bread with plain tap water because the fungi could use the sugar and starch in the bread as food. The mold didn’t grow as well on the bread sprinkled with lemon juice because lemon juice is acidic. Acids hinder the growth of many common fungi and bacteria. Answer 2: Molds grow better on some kinds of breads than others depending on the ingredients used and how the bread was made. Some breads are dry and some are moist. The amount of the sugar in different breads varies; some have sugar, honey or molasses added. Some breads are even acidic, such as sourdough. Some may have fruit or nuts or other ingredients added. Many commercial breads are made with preservatives that hinder the growth of molds and bacteria to prevent or delay spoilage. Bread baked fresh in a bakery that doesn’t use preservatives will more likely become moldy faster. All of these factors can influence how much mold will grow on a particular kind of bread.

Answer 3: Many of the colors you see on the moldy bread are due to the spores the fungi have produced. Molds reproduce by making spores at the end of stalks that rises above the surface of the bread, giving molds a fuzzy appearance. Spores are like seeds—they spread molds to new places so that they can continue to grow. Spores are usually colorful. Some fungi, such as Rhizopus nigricans (rye-zoh-puss neye-grih-cans) and Aspergillus niger (As-per-jill-us neye-jer), make black spores. Neurospora crassa (new-rah-spore-ah crah-sah) produces spores that appear pink. And the Penicillium (pen-ih-sill-ee-um) molds, the molds that make penicillin, are blue-green.

Some of the colors on your bread may be the result of growing colonies of bacteria, which also sometimes grow on old food. For example, a bacterium called Serratia marcescens (ser-ay-shuh mar-seh-sens) forms reddish colonies. You can tell bacteria colonies apart from molds because bacteria colonies appear smooth while molds look fuzzy.

Answer 4: Molds grow best in the dark, so not as much mold would be present on bread slices kept in a well-lit place.

Answer 5: Most fungi grow best around room temperature. But they can grow at a range of temperatures from cold (like in a refrigerator) to quite warm (body temperature). At temperatures colder or warmer than their favorite temperature, they usually do not grow as rapidly. If the temperature is too cold or too hot, they will not grow at all, and may even be killed.

Yeast growth experiment

As you probably know from eating numerous meals, all breads are not the same. Tortillas and pitas are flat and dense, while loaves of sandwich bread and dinner rolls are puffy and lighter. In fact, if you look closely at a piece of sandwich bread, you can see a honeycomb texture in it where bubbles formed and burst. Why these differences? Aren’t all breads made of the same basic ingredients? What made those bubbles?

The differences are caused by a microbe called yeast, pictured here. Yeast is a kind of fungus. If you open up a package of baker’s yeast bought from the supermarket and sprinkle some out, you’ll see tiny brownish grains.

hypothesis of bread mould experiment

These are clumps of dehydrated yeast cells (dehydrated means most of the water has been removed). Let them sit there for a while and watch them and you’ll soon get bored. They don’t exactly do much, do they? But put them in bread dough and after a while you can definitely see that they must be doing something. But what exactly are they doing?

You’ll find out in this activity in which you’ll make your own bread dough.

Note: This activity can be done within one hour, though you could stretch it over a few hours if you wish, depending on how many different sweeteners you want to try.

  • 2 cups of flour (plus a little extra)
  • 4 medium-sized bowls
  • 2 packages of rapid-rise yeast
  • access to warm water
  • 6 teaspoons of sugar
  • a sweetener besides sugar such as honey or artificial sweetener
  • 24 clear drinking straws (must be clear)
  • 24 clothespins
  • measuring spoons
  • ¼ cup measuring cup
  • metric ruler
  • permanent marking pen
  • notebook and pen or pencil
  • clock, watch or timer

1. Using the ruler, measure the point 3 centimeters from one end of each straw and mark that point with a line using the permanent marker.

2. Put ¼ cup of flour into each of your bowls. Mark the first bowl as the “Control.” Mark the others as 1, 2, and 3. (Just imagine that the dough in the illustration below is in four separate bowls.)

3. Measure 1 teaspoon of sugar and add it to the flour in the bowl marked 1. Put 2 teaspoons of sugar into bowl 2. Put 3 teaspoons of sugar into bowl 3.

4. Pour ¼ of a package of yeast (or ¼ teaspoon) into each of the four bowls. Using the spoon, stir together the ingredients in each bowl starting with the Control bowl.

5. Fill a cup with warm water from your faucet. The water should be warm, not hot and steaming. Dust your hands with a little flour. Carefully add the water to the Control bowl about a teaspoonful at a time and begin to knead the mixture. Your dough should eventually feel kind

hypothesis of bread mould experiment

of like Play-Doh—it should be damp, not wet. It’ll be sticky at first, but should eventually reach a point where it’s just damp enough that it no longer really sticks to the bowl or your hands. If it’s too sticky still, add a little bit more flour. Form the dough into a ball.

6. Repeat step 5 with each of the remaining bowls, working as quickly as you can. (If you have friends or classmates or parents helping out, each person should take a bowl and everyone should do step 5 at the same time.)

hypothesis of bread mould experiment

7. Working quickly, push three straws into the Control dough until the dough inside the straw reaches the 3-centimeter mark. Lay these straws by the Control bowl. Repeat this step with each of the remaining bowls.

Be sure to keep the straws beside the right bowls and don’t mix them up. (Again, if you’ve got more people working with you on this activity, each person should take a ball of dough and everyone should do this step all at the same time.)

8. Now pinch the bottoms of each of your Control dough straws, pushing the dough up from the bottom enough to clip a clothespin to the end of each straw. Mark the new height of the dough on each straw. Stand the straws upright using the clothespins as bases. Do the same with the rest of the straws. Label the batches of straws as Control, 1, 2 and 3.

9. Mark the time on your clock or watch or set your timer for 10 minutes. Wait 10 minutes. Then measure and mark the heights of the dough in each straw and record these heights and the time in your notebook. Repeat this step 10 minutes later. Repeat after another 10 minutes has passed.

hypothesis of bread mould experiment

10. During the 10-minute intervals while waiting for the dough in the straws to do its thing, discard your first batches of dough from each bowl and wash the bowls out. Dry them thoroughly. Be sure to keep an eye on the clock while you’re doing this so that you don’t miss the 10-minute deadline to check and measure your straws.

11. Repeat the dough making process only this time use a different kind of sweetener than sugar. Repeat the steps of filling and marking the straws. Label the new batch of straws and set them away from your first batch. Repeat the process of measuring the dough height in the straws at 10-minute intervals and recording the results in your notebook. Be sure to record the heights of this new batch of straws separately from the first batch.

12. Graph your results. First, calculate the average final height for each set of three straws in your first batch. Make a bar graph showing these average heights with the number of teaspoons of sugar (0, 1, 2, 3) on the horizontal axis and the height in centimeters on the vertical axis. Make a similar bar graph for your second batch of straws. See the sample graph on the right.

13. Throw away all the straws when you’re done. You might want to save the clothespins for another project in the future. Discard the dough in the bowls and wash them out. Clean up any spilled flour, sugar or yeast.

hypothesis of bread mould experiment

  • In the first batch of straws you made, which straws showed the greatest change in dough height? Why?
  • Can you guess what effect the sugar had and why?
  • Did the Control dough rise at all or not? Why or why not?
  • Did your dough made using a different sweetener besides sugar show the same results?

Answer 1: The straws containing dough from bowl 3 showed the highest rising. Since everything—the amount of flour, the amount of yeast, the temperature of the water—stayed the same except for the amount of sugar, you have probably already rightly guessed that the height of the dough rising is connected to the larger amount of sugar in this dough. Why is that? See the next question.

Answer 2: You will notice that the dough from the other bowls also rose some in their straws, the height connected to how much sugar was in the flour. The more sugar, the higher the dough rose. What can you figure out from this? Well, you’ve already read that yeast makes bread rise and become puffy instead of flat and this has something to do with yeast activity. What makes living things active? Food energy. The sugar is food for the yeast cells. The more sugar there is, the more active the yeast cells are.

Yeast cells chow down on the sugar molecules, breaking them apart in a chemical reaction and turning them into simpler elements and compounds including carbon dioxide. Carbon dioxide is a gas. Bubbles of carbon dioxide released by the yeast get trapped in the dough as bubbles. As more and more of these bubbles build up, the dough puffs up or rises. When the dough is put in the oven and baked, the carbon dioxide vaporizes in the heat, leaving spaces where the bubbles once and giving bread its honeycomb texture.

Answer 3: You probably saw some rising happen in the straws containing Control dough. This is because flour is a starch. Starches contain glucose, a form of sugar (this is why a saltine cracker tastes a little sweet if you let it sit on your tongue for a while; the enzymes in your saliva break the cracker starch down into glucose and other simpler molecules). So even though you didn’t add any sugar to the Control dough, it already contained some for the yeast to much on. However, because the amount of sugar in this dough was much less than in the others, less carbon dioxide could be made by the yeast in this batch and the dough couldn’t rise as much in comparison.

Answer 4: Different sweeteners will have similar or lesser effects on dough rising as sugar. You could try this experiment with as many different types of sweetening agents as you want to compare the results. Then you could do some research on the types of sugars in these different sweeteners to determine which ones work best as food for yeast.

Stop the Mold: A Bread Mold Study

This experiment examined how alcohol , pickle juice and mercurochrome affect mold growth. Mercurochrome and ethanol were selected because each stops wounds from infection. Pickle juice, a weak acid, was chosen to examine whether decreasing pH would inhibit mold growth. Method: Mold was grown on bread allowing enough growth so that mold type could determined. The most common mold growing was used to inoculate other four slices of bread. Three drops of mercurochrome, pickle juice, alcohol were each added to a slice, leaving the fourth slice as a control. Mold growth was recorded daily. Results: Pink, green, yellow and black molds grew on the bread. The green mold was used for this study. None of the agents tested totally inhibited mold growth although pickle juice worked the better than the other agents.

The main types of mold inhibitors are (1) individual or combinations of organic acids (for example, propionic, sorbic, benzoic, and acetic acids), (2) salts of organic acids (for example, calcium propionate and potassium sorbate), and (3) copper sulfate. Solid or liquid forms work equally well if the inhibitor is evenly dispersed through the feed. Generally, the acid form of a mold inhibitor is more active than its corresponding salt.

Any other chemical substance may also be tested for its effect on mold.

INTRODUCTION

To experiment with fungi, mycologists often need to grow them. Simply allowing bread to become moldy is not an experiment. An experiment is the test of an idea. Often, this idea is expressed in the form of the question: what? What if…? What happens when…? What kind of effect…? Experiments are designed to use the methods and materials that will give the most complete and accurate answer to an inquiry.

DESIGNING EXPERIMENTS

Fungi break down and absorb organic material for their nourishment, so any experiment must first provide them with food. Oxygen and moisture are also necessary. A material for the growth of fungi for experiments is called a medium.

Most commercially prepared media for growing fungi are extracts of plant materials like potatoes. A medium that is specially prepared to contain only the exact nutrients required by one species of fungus is called a “minimal medium”.

The choice of growth medium depends on the question that is being asked. If the question is “What kinds of fungi grow naturally on bread?” the choice of medium is simple. You could just put a slice of bread in a plastic bag, close it to retain moisture and await mold growth.

However, observing only one slice of bread would not make an effective experiment. Your chosen slice may not have any mold spores on it, or contain spores of all the species present in the loaf. It might be too dry to allow growth. You would have to use a number of bags to account for all reasonably possible growth failures and successes. The slices of bread would be replicates. Replicates allow the treatment to be repeated often enough to allow you to determine if the results are significant or the product of random chance..

You will also need to decide how to record your results. Do you identify each species of mold by its scientific name, or do you just describe them (fluffy red colonies, white fuzzy spots, blue-green velvet, etc.?)

A more complicated question requires the design of a more complicated experiment. At first glance, “What effect does the preservative in some breads have on mold growth?” seems as if it could be answered with a loaf of bread and some plastic bags, like the first experiment. However, the best experiment on the effect of a preservative on mold growth would use two loaves of bread. These loaves would be identical in preparation and ingredients, except for the presence or absence of the preservative. The bread without the preservative would be the control and the bread containing the preservative would be the treatment. Replication of both treatment and control gives the experimenter a way to understand the effect of substance by showing what happens when it is both present and absent.

Materials and Equipment:

Can be extracted from experiment design.

Results of Experiment (Observation):

Experiments are often done in series. A series of experiments can be done by changing one variable a different amount each time. A series of experiments is made up of separate experimental “runs.” During each run you make a measurement of how much the variable affected the system under study. For each run, a different amount of change in the variable is used. This produces a different amount of response in the system. You measure this response, or record data, in a table for this purpose. This is considered “raw data” since it has not been processed or interpreted yet. When raw data gets processed mathematically, for example, it becomes results.

Calculations:

No calculation is required for this project.

Summary of Results:

Summarize what happened. This can be in the form of a table of processed numerical data, or graphs. It could also be a written statement of what occurred during experiments.

It is from calculations using recorded data that tables and graphs are made. Studying tables and graphs, we can see trends that tell us how different variables cause our observations. Based on these trends, we can draw conclusions about the system under study. These conclusions help us confirm or deny our original hypothesis. Often, mathematical equations can be made from graphs. These equations allow us to predict how a change will affect the system without the need to do additional experiments. Advanced levels of experimental science rely heavily on graphical and mathematical analysis of data. At this level, science becomes even more interesting and powerful.

Conclusion:

Using the trends in your experimental data and your experimental observations, try to answer your original questions. Is your hypothesis correct? Now is the time to pull together what happened, and assess the experiments you did.

Related Questions & Answers:

What you have learned may allow you to answer other questions. Many questions are related. Several new questions may have occurred to you while doing experiments. You may now be able to understand or verify things that you discovered when gathering information for the project. Questions lead to more questions, which lead to additional hypothesis that need to be tested.

Possible Errors:

If you did not observe anything different than what happened with your control, the variable you changed may not affect the system you are investigating. If you did not observe a consistent, reproducible trend in your series of experimental runs there may be experimental errors affecting your results. The first thing to check is how you are making your measurements. Is the measurement method questionable or unreliable? Maybe you are reading a scale incorrectly, or maybe the measuring instrument is working erratically.

If you determine that experimental errors are influencing your results, carefully rethink the design of your experiments. Review each step of the procedure to find sources of potential errors. If possible, have a scientist review the procedure with you. Sometimes the designer of an experiment can miss the obvious.

References:

Visit your local library and find some books and publications related to mold or fungus. Following are some online resources.

About Mold: http://www.e-tulsa.net/mold1.htm l

  • Mildew Diseases
  • Fungi of California
  • Fungi of Sierra Nevada
  • Tayside fungi

hypothesis of bread mould experiment

It is always important for students, parents and teachers to know a good source for science related equipment and supplies they need for their science activities. Please note that many online stores for science supplies are managed by MiniScience.

Testimonials

" I called School Time and my husband and son came with me for the tour. We felt the magic immediately."

- Robby Robinson

" My husband and son came with me for the tour. We felt the magic immediately."

- Zoe Ranson

Contact Info

Our address, working hours.

Week Days: 07:00-19:00

Saturday: 09:00-15:00

Sunday: Closed

Science Project

hypothesis of bread mould experiment

  • Science Projects
  • Project Guides
  • STEM Activities
  • Lesson Plans
  • Video Lessons

hypothesis of bread mould experiment

  • Unanswered topics
  • Active topics
  • Board index Active Forums (Make all new posts here) Grades K-5 Grades K-5: Life, Earth, and Social Sciences

Moderators: AmyCowen , kgudger , bfinio , MadelineB , Moderators

Post by lil jo » Sun Dec 28, 2008 3:27 pm

Re: bread mold

Post by donnahardy2 » Sun Dec 28, 2008 5:10 pm

Post by 610159 » Tue Jan 06, 2009 3:26 pm

Post by donnahardy2 » Wed Jan 07, 2009 7:28 am

Post by lil jo » Tue Jan 27, 2009 4:25 pm

Post by donnahardy2 » Wed Jan 28, 2009 9:23 am

Post by lil jo » Tue Feb 10, 2009 6:48 pm

Post by donnahardy2 » Thu Feb 12, 2009 2:53 pm

Post by staryl13 » Fri Feb 13, 2009 9:34 pm

Post by lil jo » Fri Feb 20, 2009 4:18 pm

Post by donnahardy2 » Fri Feb 20, 2009 6:45 pm

Post by lil jo » Mon Feb 23, 2009 12:59 pm

Post by donnahardy2 » Mon Feb 23, 2009 3:42 pm

Post by lil jo » Wed Feb 25, 2009 9:10 am

Post by donnahardy2 » Wed Feb 25, 2009 4:50 pm

Return to “Grades K-5: Life, Earth, and Social Sciences”

  • Announcements
  • Active Forums (Make all new posts here)
  • ↳   Grades K-5
  • ↳   Grades K-5: Life, Earth, and Social Sciences
  • ↳   Grades K-5: Physical Science
  • ↳   Grades K-5: Math and Computer Science
  • ↳   Grades 6-8
  • ↳   Grades 6-8: Life, Earth, and Social Sciences
  • ↳   Grades 6-8: Physical Science
  • ↳   Grades 6-8: Math and Computer Science
  • ↳   Grades 9-12
  • ↳   Grades 9-12: Life, Earth, and Social Sciences
  • ↳   Grades 9-12: Physical Science
  • ↳   Grades 9-12: Math and Computer Science
  • ↳   Advanced Science Competitions (Intel ISEF, Intel STS, Siemens Competition, JSHS, etc.)
  • ↳   Getting Started
  • ↳   Preparing for the Competition
  • ↳   STEM Activities
  • ↳   Interview Requests
  • ↳   Careers in Science
  • ↳   Raspberry Pi Projects Kit
  • ↳   Junior Solar Sprint
  • ↳   SimPandemic
  • ↳   Using SimPandemic
  • ↳   General Discussion
  • ↳   Preparing for the Science Fair
  • ↳   Intel ISEF Preparation
  • ↳   Science Teachers: Fairs, Projects, and General Support
  • ↳   Grades K-5: Getting Ready for the Science Fair
  • ↳   Grades 6-8: Getting Ready for the Science Fair
  • ↳   Grades 9-12: Getting Ready for the Science Fair
  • ↳   Physical Science
  • ↳   Life, Earth, and Social Sciences
  • ↳   Math & Computer Science Sponsored by Hyperion Solutions Corp
  • ↳   General Questions
  • ↳   InnovatioNation Teachers
  • ↳   Grades 6-8: Wind Tunnel
  • ↳   Grades 9-12: Wind Tunnel
  • ↳   A Magnetic Primer Designer
  • ↳   Bridge Design
  • ↳   Build a Gauss Rifle!
  • ↳   Build a Simple Circuit
  • ↳   Build Your Own Crystal Radio
  • ↳   Chemistry of Ice-Cream Making
  • ↳   Do Oranges Lose or Gain Vitamin C After Being Picked?
  • ↳   Electrolyte Challenge: Orange Juice vs. Sports Drink
  • ↳   Enzyme-Catalyzed Reactions
  • ↳   Forensic Science: Building Your Own Tool for Identifying DNA
  • ↳   From Dull to Dazzling: Using Pennies to Test How pH Affects Copper Corrosion
  • ↳   How Do Roots Grow...
  • ↳   How Does Soil Affect the pH of Water
  • ↳   Investigating the 'Mpemba Effect': Can Hot Water Freeze Faster than Cold Water?
  • ↳   Is this connected to that? Use a homemade electronic tester to find out if electricity can flow between two objects.
  • ↳   How Are Antibodies Used for Blood Typing?
  • ↳   It's All in the Wrist
  • ↳   Measuring the Sugar Content on a Liquid with a Laser Pointer
  • ↳   Potions and Lotions
  • ↳   Shaking Up Some Energy
  • ↳   Spin Right 'Round with this Simple Electric Motor
  • ↳   Sweet as Sugar
  • ↳   The Strength of an Electromagnet
  • ↳   Veggie Power! Making Batteries from Fruits and Vegetables
  • ↳   Which Orange Juice Has the Most Vitamin C?
  • Board index
  • All times are UTC-07:00

Moldy Bread Science Experiment Is a Gross Reminder of How Many Germs Are on Our Hands

Moldy Bread Experiment Pictures

Have you ever wondered how many germs are lurking on your laptop? Or what happens when you don’t wash your hands? Educators Jaralee Metcalf and Dayna Robertson conducted an experiment, found through the C.S. Mott Children's Hospital website, that will open your eyes to just how much bacteria is on your hands and devices if left uncleaned.

The experiment uses sliced bread to illustrate the accumulation of germs, and the teachers used five pieces to each represent a different phase of cleanliness. One slice (the control) was left untouched. The other pieces were handled by all of the students in the following states: with unwashed hands, hands cleaned with a sanitizer, and hands washed with warm water and soap. In addition, a piece of bread was rubbed on all of their classroom laptops. They then left the bread alone for a few days to watch how the slices reacted.

The results of the experiment will remind you that you should always wash your hands. Aside from the control piece, the soap and water slice was the only piece of bread that had no mold on it. Even hand sanitizer, which we might think as a substitute for hand washing, showed evidence of mold. But the most disgusting outcomes—by far—were the bread slices touched by unwashed hands and wiped on the computers. The unwashed hands had yellowish mold spread across its surface with some green patches starting to show. The laptop slice was even worse and had turned almost completely green.

Metcalf and Robertson’s moldy bread exercise was documented in a series of photos and they now serve as a powerful classroom tool to remind their students to always wash their hands. And in Metcalf’s now-viral Facebook post , it is reminding people from around the world to do the same.

Educators Jaralee Metcalf and Dayna Robertson conducted a moldy bread science experiment that is a powerful reminder for you to  always wash your hands.

Moldy Bread Science Experiment

The teachers and their students each touched four slices of bread in different states of cleanliness. One piece of bread was untouched and was the control for the experiment.

Moldy Bread Experiment Pictures

The bread touched with hands cleaned with soap and warm water didn't have any mold, but the other slices…

Moldy Bread Experiment Pictures

… were gross! Especially the piece that had been rubbed on classroom computers.

Moldy Bread Science Experiment

Jaralee Metcalf: Facebook | Instagram

My Modern Met granted permission to feature photos by Jaralee Metcalf.

Related articles:.

This Teen Invented an Ingenious Solution to Eliminating Blind Spots in Cars

Miss Virginia Breaks Stereotypes by Performing a Science Experiment as Her Talent

Felted Fungus Art “Growing” in Petri Dishes Shows the Unexpectedly Cute Side of Mold

Get Our Weekly Newsletter

Learn from top artists.

hypothesis of bread mould experiment

Related Articles

hypothesis of bread mould experiment

Sponsored Content

More on my modern met.

hypothesis of bread mould experiment

My Modern Met

Celebrating creativity and promoting a positive culture by spotlighting the best sides of humanity—from the lighthearted and fun to the thought-provoking and enlightening.

  • Photography
  • Architecture
  • Environment

IMAGES

  1. Easy Science: Bread Mold Experiment

    hypothesis of bread mould experiment

  2. Bread Mold Experiment

    hypothesis of bread mould experiment

  3. PPT

    hypothesis of bread mould experiment

  4. Bread Mold Experiment Hypothesis

    hypothesis of bread mould experiment

  5. Bread Mold Experiment Report Pdf

    hypothesis of bread mould experiment

  6. Mouldy Bread Experiment (teacher made)

    hypothesis of bread mould experiment

VIDEO

  1. How to make Tiny bread mould DIY #shorts #trending

  2. BREAD MOULD #youtubeshorts #viralvideo #trending #facts #shorts #youtube 859

  3. Easter Science Experiment for Kids

  4. Mangoes round the year .Class 5 ( EVS). 😋 Recipes made from mangoes and bread mould experiment

  5. How to Draw Bread Mould

  6. Fun With Science, Class-6, Activity-12, Bread Mould Experiment

COMMENTS

  1. Easy Science: Bread Mold Experiment

    Bread will mold faster in the open air than in a plastic bag. Our experiment was simple. We placed bread in various conditions (we had dry dark, dry light, wet, open, and in a closed bag) and Monkey came up with a hypothesis for which piece of bread would mold first. She predicted it would be the bread we placed in the paper bag in the pantry.

  2. Growing Mold on Bread Experiment

    Procedure. Sprinkle water on the slice of bread. Put the bread in the plastic bag and zip it. Use the tape to secure it further. Write today's date on the tape with the marker. Leave the bag undisturbed for 7 days in a warm place outside the house. Track the growth of the mold by checking the sample every day.

  3. Mold Bread Experiment

    Hypothesis. In the Mold Bread Experiment we are trying to prove that; "Mold grows quicker at higher temperatures."( What You Need for the Mold Bread Experiment. 15 slices of bread. Any sort will do but it is perfectly fine to use cheap white sliced bread as then you will know that all of the slices are a similar size, weight and thickness. You ...

  4. A Simple Experiment to Grow and Study Bread Mold

    Growing mold can be a simple experiment, and performed on a slice of bread. However, to make it interesting and more detailed you can work on 5 samples of breads rather than just one. So, gather the above equipment and follow the below steps. Take the cotton swabs and run them over areas which have dust, like under a table, bed, or basement.

  5. MOLD GROWTH ON BREAD AND FRUIT

    EXPERIMENT VIDEO GUIDE. 1. Use the measuring cup to measure and add 1/4 cup or 4 ounces of water to a saucepan or microwavable bowl and mix in 1/2 cup of sugar. 2. Gently heat the water-sugar mixture on the stove or in the microwave, stirring occasionally until all of the sugar is dissolved.

  6. Moldy Bread Experiment

    4. Place the bags in the appropriate areas of the house. We put a couple of bread slices near the window to get sun exposure, a couple in the kitchen cabinets to keep them in the dark, and a couple in the fridge to see how the temperature would affect the mold growth on the bread. 5.

  7. PDF Lesson 3: Investigating Bread Molding

    Lesson 3: Investigating Bread Molding. Tab 1: Overview. Students conduct an investigation to explore what happens when bread molds. They use two process tools in this lesson to record their ideas: The Predictions and Planning Tool and the Evidence-Based Arguments Tool. Download PDF of Lesson 3 Teacher's Guide.

  8. PDF Bread and Mold

    Bread and Mold Experiment Connected Standard: S.K-2.A.2.1.2 Describe outcomes of an investigation. What You Will Need: • 4 Pieces of Bread * • Permanent Marker • 4 Ziplock Bags • Gloves or Tongs *highly recommend - use fresh baker's bread for faster results! Instructions: 1.

  9. Decomposers

    Activity 3.1: Predictions and Planning about Bread Molding. Students (a) develop hypotheses about how matter moves and changes and how energy changes when bread molds and (b) make predictions about how they can use their investigation tools—digital balances and BTB—to detect movements and changes in matter. Activity 3.2: Observing Bread Molding

  10. Bread Mold Experiment

    STEP 2: Add 10 drops of water to one slice and seal. STEP 3: Now add a dry piece of bread to the second bag. STEP 4: Place the slices in a warm, dark place if possible. Observe and record. Tip: Make observations every 2nd day over the course of 2 weeks depending on how fast the mold is growing.

  11. MOLD GROWTH ON BREAD AND FRUIT

    Throw the used paper towels in the trash. Dispose of left over surface disinfectant by pouring it down the sink and running water for at least 30 seconds. 7. Wash your hands thoroughly with soap and water. Dry your hands with paper towel. Growth of mold on bread and fruit. Growth of mold on bread and fruit.

  12. How to Make Mold Grow on Bread

    One spray is sufficient. Alternative methods for keeping the environment moist include: [2] Placing a wet paper towel in the plastic bag with the bread. Sprinkling some water over the top of the piece of bread. Spraying the inside of the bag instead of directly on the bread. 3. Seal the bread in the plastic bag.

  13. Bread Mold: The Experiment

    The hypothesis that bread mold will grow more quickly in warm and damp environments is proven to be true. Mold will grow quickly on bread in humid and warm conditions. Bread should be kept in dark, dry and cool places for it to last longer. Bread can also last longer if stored in the fridge or in airtight containers.

  14. PDF Moldy Bread Experiment

    rab your bread slices. If they are not already sliced, ask an adult t. help slice the bread. Ask them to wear gloves wh. le. andling the bread.03. Use clean tongs or carefully grab one slice of bread. ith your gloved hands. Place the bread in. the "Contro. ". bag. Seal the bag.04. Take a second slice of bread.

  15. PDF Science Experiment. How long does it take for a slice of bread to grow

    White Bread Day 6. After 6 days a small spot of green mould is growing in the middle of the bread. White bread Day 9. Mould is growing quickly now. White bread Day 17. So much green mould now! Notes. Why do you think mould grew faster on the slice of white bread compared to the gluten free bread?

  16. Bread Mold Experiment

    This bread mold experiment will help your child find out, while developing important hypothesis-making and experiment-designing skills. 1. Put bread in all three bags. 2. Take one bag and put it in a dark place. Place the next bag in the refrigerator. Place the last bag in a sunny area. Make sure each bag is sealed tightly.

  17. Which Bread Molds the Fastest?

    Place a slice of bread on its own plate, and sprinkle a teaspoon of water on each sample. Make sure the slices are equally damp, but not soggy. Place all five plates in a warm, dark place where they won't be bothered (like an empty cabinet) and keep some distance between the samples. Don't let the plates touch.

  18. Factors affecting the the growth of molds or yeast

    Design an experiment to test each hypothesis. Make a step-by-step list of what you will do to answer each question. This list is called an experimental procedure. For an experiment to give answers you can trust, it must have a "control." ... Stop the Mold: A Bread Mold Study. This experiment examined how alcohol, pickle juice and ...

  19. Mold Bread Experiment

    "Mold grows quicker at higher temperatures."(Hypothesis [1]) What You Need for the Mold Bread Experiment 15 slices of bread. Any sort will do but it is perfectly fine to use cheap white sliced bread as then you will know that all of the slices are a similar size, weight and thickness. You must make a note of the brand and use-by date so that ...

  20. Ask an Expert: bread mold

    Experiments with bread mold can make really great science fair projects, so I hope this will help you get started. ... You set up the experiment to test the hypothesis as carefully as possible, and then wait for results. If nothing happens, it's nice to have enough time to set up the experiment again, but if it doesn't work, you just report ...

  21. Moldy Bread Science Experiment Is a Gross Reminder of How Many Germs

    The results of the experiment will remind you that you should always wash your hands. Aside from the control piece, the soap and water slice was the only piece of bread that had no mold on it. Even hand sanitizer, which we might think as a substitute for hand washing, showed evidence of mold. But the most disgusting outcomes—by far—were the ...