

How to Change Transparency of a Shape in Google Slides (Easy Guide)

Google Slides allows users to enhance presentations by adjusting transparency. To alter a shape’s transparency, select the shape, click the paint bucket icon, press + under Custom, and slide to desired transparency. This adds depth and visual appeal to presentations.
Google Slide is becoming a popular way to give presentations. You can use many different features to make your presentation more visually appealing, including transparency. In this article, we’ll show you how to change the transparency of a shape in Google Slides. Keep Reading!
Why Would I Want to Change the Transparency of a Shape?
Can i change the transparency of text in google slides.
Adjusting the transparency of shapes in Google Slides offers multiple benefits. For instance, during a presentation, using semi-transparent shapes can:
- Add more depth to your presentation
- Create an interesting visual effect
- Highlight another element in your presentation
These are just a few examples – there are endless possibilities for how you can use transparency to enhance your presentation.
How to Change Transparency of a Shape in Google Slides
If you’re interested in tweaking the transparency of a shape in your slide deck, the process is straightforward. Follow these steps to expertly modify the opacity of your chosen shapes:
Launch the desired Google Slides presentation. Select the shape whose transparency you wish to modify.

Click on the paint bucket icon in the toolbar. This action will bring up the “Fill color” choices.

Click the + symbol located under the Custom section in the Fill color tab.
In the opened window, slide the transparency adjuster left or right . Sliding it further to the left increases the shape’s transparency. After achieving the desired transparency level, click “OK”.

That’s all you need to do! You’ve now successfully changed the transparency of a shape in Google Slides.

Yes, it is possible to change the transparency of text in Google Slides. First, press on Insert > WordArt .

Then, type out the text that you want to use.

You will find something like this:

Afterward, press the Paint bucket icon and follow the same steps as outlined above. Your text will now have the transparency that you typed.

Can I Change the Transparency of Image in Google Slides?
Beyond shapes, you might wonder if Google Slides allows transparency adjustments for images. Let’s delve into the process of altering the opacity of images in your presentation:
Open the Google Slides presentation that you want to edit. Click on the image that you want to change the transparency for.

Now press the “Format options” icon in the toolbar.
In the “Adjustments” tab, adjust the transparency by moving the slider to the left or right. The further you move the slider to the left , the more transparent the image will become. Once you’re happy with the transparency, click “Apply” .

That’s it! You’ve now successfully changed the transparency of the image in Google Slides.
We hope this article helped you learn how to change the transparency of a shape in Google Slides. You can use these features to enhance your presentations and make them more visually appealing. As always, if you have any questions or comments, please feel free to leave a comment below!
Related Posts:

How to Make Shapes Transparent in Google Slides: A Step-by-Step Guide
Author: Ayan Ahmad Fareedi
writer at MagicSlides
Published 18 October 2024
Learn how to make shapes transparent in Google Slides with our step-by-step guide, including useful tips and tricks.
Why Use Transparency in Google Slides?
- Enhanced Visual Appeal: Transparent shapes can add depth and sophistication to your slides.
- Highlighting Key Points: Use transparent shapes to draw attention to specific content without overshadowing it.
- Layered Design: Transparent shapes allow for creative layering, which can make your slides look more professional.
How to Make Shapes Transparent in Google Slides?
Step-by-step guide to making shapes transparent, step 1: insert a shape.
- Open your Google Slides presentation.

- Go to the slide where you want to insert a shape.

- Click on the “Insert” menu at the top.

- Select “Shape” from the dropdown, and choose the type of shape you want (e.g., rectangle, circle, arrow).
Step 2: Customize the Shape
- Click on the shape you’ve inserted to select it.

- Use the corner handles to resize the shape as needed.
- Move the shape around the slide to position it where you want it.
Step 3: Adjust the Shape’s Transparency
- With the shape still selected, click on the “Fill color” icon (a paint bucket) in the toolbar.

- You’ll see a button labeled “Transparent.” Click on this to make the shape transparent.

Step 4: Adjusting Border Transparency (Optional)
- If your shape has a border, you can adjust its transparency too.
- Click on the “Border color” icon (a pencil) in the toolbar.
- Select “Custom” from the color palette.
- Use the transparency slider to adjust the border's visibility.
Step 5: Apply Effects and Enhancements (Optional)
- You can add shadows or reflections to the shape by selecting the shape and clicking on the “Format options” menu in the toolbar.
- Explore options like “Drop Shadow” or “Reflection” to add a professional touch to your shape.
Tips and Tricks for Using Transparent Shapes in Google Slides
- Layering Shapes and Text: Place transparent shapes over images or other shapes to create a layered effect. This can make your slides more engaging and visually dynamic.
- Highlighting Text: Use a semi-transparent shape behind text to highlight it without blocking the background image or design.
- Creating Overlays: Use a large, semi-transparent rectangle over the entire slide as an overlay. This is a great way to make text stand out or create a more subdued background for other elements.
- Using Gradients: Google Slides also allows you to add gradient fills to shapes. You can create a transparent gradient by adjusting the transparency level of one or more of the gradient colors. This adds depth and interest to your shapes.
- Combining Transparency with Animations: Apply entrance or exit animations to your transparent shapes to create a more dynamic presentation. For example, a transparent shape can gradually appear or disappear, creating a smooth visual transition.
- Transparent Images: If you have an image with a transparent background (like a .png file), you can use it alongside transparent shapes to create unique visual effects.
- Grouping Shapes: If you’re using multiple shapes together, group them to maintain their alignment and size when adjusting transparency. To group shapes, select all the shapes you want to group, right-click, and choose “Group.”
- Custom Colors and Brand Consistency: Use custom colors that match your brand palette for shapes and adjust their transparency. This maintains brand consistency and professionalism in your presentations.
Troubleshooting Common Issues
Issue 1: transparency slider not showing, issue 2: shape not appearing transparent, issue 3: text visibility over transparent shapes.
- Increase the shape's transparency slightly so the background becomes more visible.
- Change the text color to a contrasting one.
- Add a subtle shadow to the text for better visibility.
Share on socials
Create ppt using ai.
Just Enter Topic, Youtube URL, PDF, or Text to get a beautiful PPT in seconds. Use the bulb for AI suggestions.
character count: 0 / 6000 (we can fetch data from google)
upload pdf, docx, png, mp4, pptx, mp3
less than 2 min
How to Make a Jeopardy Game on Google Slides
18 September 2024
How to Group in Google Slides: A Step-by-Step Guide
Celebrating Father's Day 2024: Heartfelt Quotes and Messages to Honor Your Dad
15 September 2024
How to Auto Advance Google Slides: A Detailed Guide
How to Translate Google Slides into Spanish: A Step-by-Step Guide
12 September 2024
How to Use Scribble on Google Slides: A Step-by-Step Guide
How to Create a Template in Google Slides: A Step-by-Step Guide
How to Upload a PowerPoint in Google Slides
11 September 2024
How to Make a Metrics Slide with AI in Just 5 Steps
9 September 2024
Stunning presentations in seconds with AI
Install MagicSlides app now and start creating beautiful presentations. It's free!

Free AI PPT Tools
Making Shapes Transparent in Google Slides: A Step-by-Step Guide
Making shapes transparent in Google Slides is a neat trick that can add a professional touch to your presentation. By adjusting the transparency of shapes, you can layer objects, create custom designs, or emphasize certain elements. Here’s a quick guide to help you achieve this effect: select the shape, click on the ‘Fill color’ tool, and adjust the transparency slider. That’s it! Now let’s dive into the details.
Step by Step Tutorial on Making Shapes Transparent in Google Slides
Before we start, it’s important to know that making shapes transparent in Google Slides can elevate your presentation by allowing you to create overlays, highlight text, or simply add a unique design flair. Follow these steps, and you’ll be a pro in no time!
Step 1: Open your Google Slides presentation
First, you’ll need to access your Google Slides presentation where the shape you want to make transparent is located.
Once you’ve opened your presentation, navigate to the slide that contains the shape you wish to modify. If you haven’t added a shape yet, simply go to the slide where you want to add one.
Step 2: Select the shape
Click on the shape you want to make transparent. If you haven’t added a shape yet, you can insert one by clicking on the ‘Shape’ tool in the toolbar and selecting your preferred shape.
After inserting your shape, click on it to ensure it is selected. You will know it’s selected when you see the blue border around the shape.
Step 3: Click on the ‘Fill color’ tool
With the shape selected, look for the ‘Fill color’ tool in the toolbar – it looks like a paint bucket. Click on it to reveal the color options.
In the color options menu, you’ll see a range of colors to choose from. At the bottom of this menu, there’s a slider that will adjust the transparency of the shape.
Step 4: Adjust the transparency slider
In the ‘Fill color’ menu, drag the transparency slider to the left to increase transparency, or to the right to decrease it.
As you move the slider, you’ll see the shape become more transparent or more opaque, depending on the direction you’re dragging. Adjust it until you reach the desired level of transparency.
After completing these steps, your shape will have the transparency level you’ve chosen. It’s as simple as that! Now, you can experiment with layering shapes or creating interesting design elements with this newfound skill.
Tips for Making Shapes Transparent in Google Slides
- Use transparency to layer shapes and create depth in your slides.
- Adjusting transparency is also useful for dimming the background of text boxes to make text stand out.
- Remember that too much transparency might make elements hard to see, so find a balance.
- Use the transparency tool to create watermarks or subtle background images.
- Save your original shape in case you need to revert back to a non-transparent version.
Frequently Asked Questions
How do i reset the transparency of a shape.
To reset the transparency, simply select the shape, click on the ‘Fill color’ tool, and move the transparency slider all the way to the right to make it fully opaque.
Can I make images transparent as well?
Yes, you can adjust the transparency of images by clicking on the image and following a similar process using the ‘Adjustments’ option in the image formatting tools.
Will the transparency effect show up when I print my slides?
Transparency effects will be visible in printouts, but keep in mind that printers may render colors and transparency differently than on-screen displays.
Can I apply transparency to only part of a shape?
No, transparency settings apply to the entire shape. If you need different transparency levels within a shape, consider breaking it into multiple shapes.
Is there a shortcut to adjust transparency more quickly?
There isn’t a specific keyboard shortcut, but accessing the ‘Fill color’ tool quickly by right-clicking on the shape can save some time.
- Open your Google Slides presentation.
- Select the shape.
- Click on the ‘Fill color’ tool.
- Adjust the transparency slider.
Making shapes transparent in Google Slides is a breeze once you know where to find the right tools. With just a few clicks, you can add a professional and polished look to your slides. Whether you’re aiming to enhance the aesthetics of your presentation or draw attention to certain areas, adjusting shape transparency can be a game-changer. The key is to experiment with different transparency levels to see what works best for your design. Try layering shapes, creating intriguing backgrounds, or highlighting text with these simple, yet effective techniques. Remember, the goal is to make your presentation not just informative but visually compelling, and mastering the art of transparency is a step in the right direction. So, go ahead and give it a try – your audience will surely notice the difference!

Matthew Burleigh has been writing tech tutorials since 2008. His writing has appeared on dozens of different websites and been read over 50 million times.
After receiving his Bachelor’s and Master’s degrees in Computer Science he spent several years working in IT management for small businesses. However, he now works full time writing content online and creating websites.
His main writing topics include iPhones, Microsoft Office, Google Apps, Android, and Photoshop, but he has also written about many other tech topics as well.
Read his full bio here.
Share this:
Related posts:.
- Can I Convert My Powerpoint to Google Slides?
- How to Make a Picture Transparent in Powerpoint 2010
- How to Make a Transparent Background in Photoshop CS5
- How to Make an Image Transparent in Google Slides on iPad: A Guide
- How to Add a Border to a Picture in Google Slides
- How to Insert Text Box in Google Docs
- How to Change the Font on All Slides in Google Slides
- How to Delete Multiple Slides in Google Slides
- How to Make an Image Transparent in Google Docs
- How to Drag Slides From One PowerPoint to Another: A Step-by-Step Guide
- How to Make a Shape on Microsoft Word 365: A Step-by-Step Guide
- How to Make an Image Transparent: a step-by-step guide
- How to Make a Microsoft Word Group of Shapes: 2024 Guide
- How to Place Shapes in a Semi-Circle in PowerPoint: A Step-by-Step Guide
- How to Change the Shape of an Image in Google Slides: A Step-by-Step Guide
- How to Place Transparent Images in Word: A Step-by-Step Guide
- How to Save a Slide from Google Slides as a Picture
- How to Make All Columns the Same Width in Excel 2013
- How to Access Google Slides: A Step-by-Step Guide
- How to Insert a Circle in Google Slides
How to Make a Shape Transparent in Google Slides
- Last updated May 3, 2023
Presenting your ideas in informative and visually appealing ways is always important. By learning how to make a shape transparent, you can add depth and contrast to your slides, making them more engaging and memorable.
Whether you’re creating a business proposal, a school project, or a personal presentation, the ability to make a shape see-through in Google Slides will definitely enhance your presentations.
In this article, we will provide you with a step-by-step guide on how to make a shape transparent in Google Slides, as well as update images and text. Keep reading to make your presentations stand out!
Table of Contents
Why Should You Make a Shape Transparent in Google Slides?
Creating an opaque or transparent shape in Google Slides can improve the design and visual impact of your presentation. By reducing the opacity of a shape, you can highlight and draw attention to the content behind it. This is especially useful when you have a busy background or multiple elements on a slide.
Adjusting the transparency of shapes can also create aesthetically interesting effects, such as layering different shapes with varying levels of transparency to produce unique visual effects. Adjusting the transparency of shapes can create overlays that add context or additional information to an image or graphic, such as adding a transparent shape with text on top of an image to provide a caption or explanation.
How to Make a Transparent Shape in Google Slides
To change the opacity of shapes in Google Slides, open the presentation you want to edit.
- Click on the shape you want to alter the transparency by clicking on it. From the toolbar, click on the paint bucket icon to open “color fill options.”
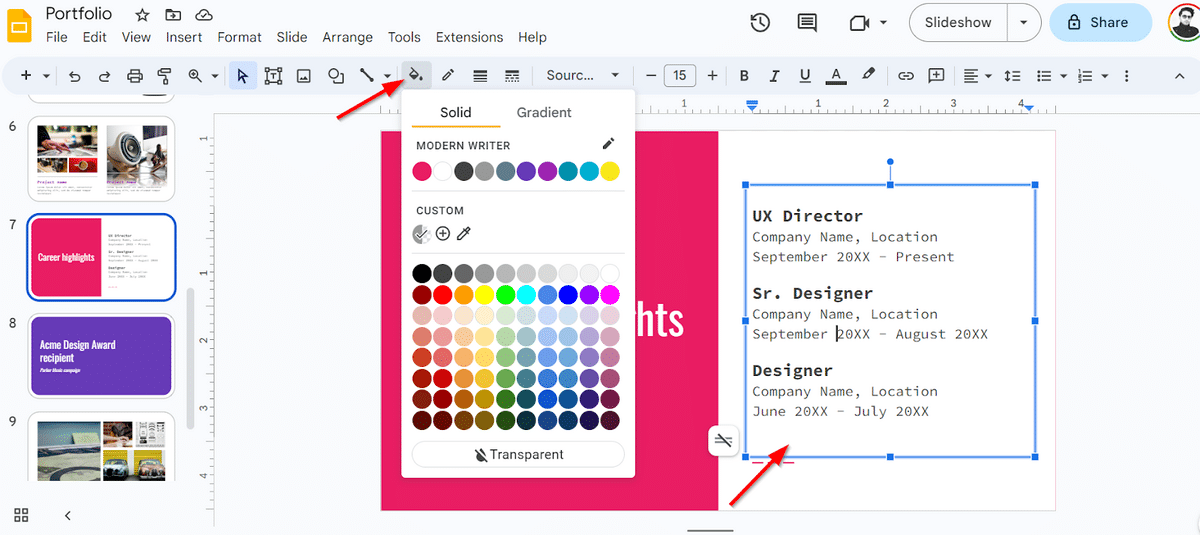
- Click on the “plus (+)” from the “Custom” tab.
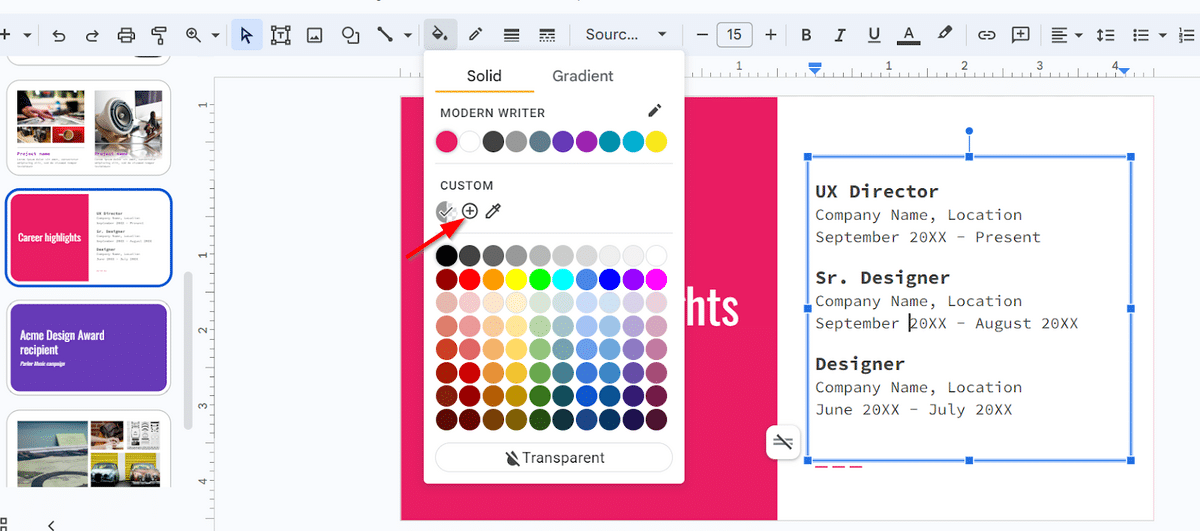
- Use the slider from the new window to adjust transparency. By shifting the slider to the left, you can increase the transparency of the shape (and vice-versa).
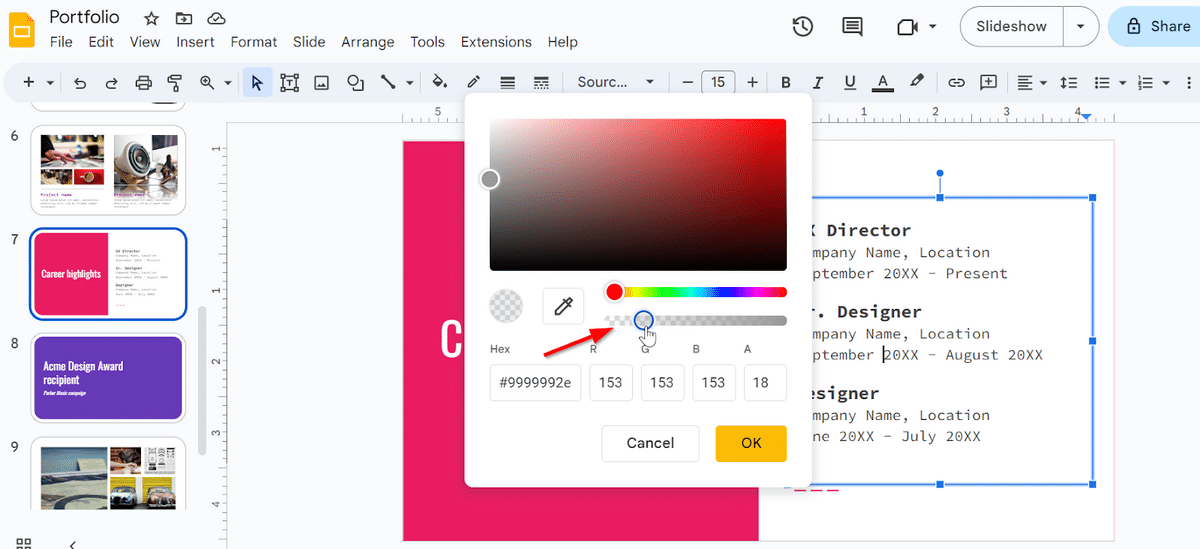
You’ve now successfully changed the opacity of a shape in Google Slides!

How to Change the Transparency of an Image in Google Slides
As opposed to shapes, you cannot change the transparency of an image using the fill color option. Instead, you have to select format options to be able to change the opacity of an image. Here’s how you can change the transparency of an image in Google Slides:
- In your Slides presentation, click on the specific image you want to adjust, then click on the “Format options” button.
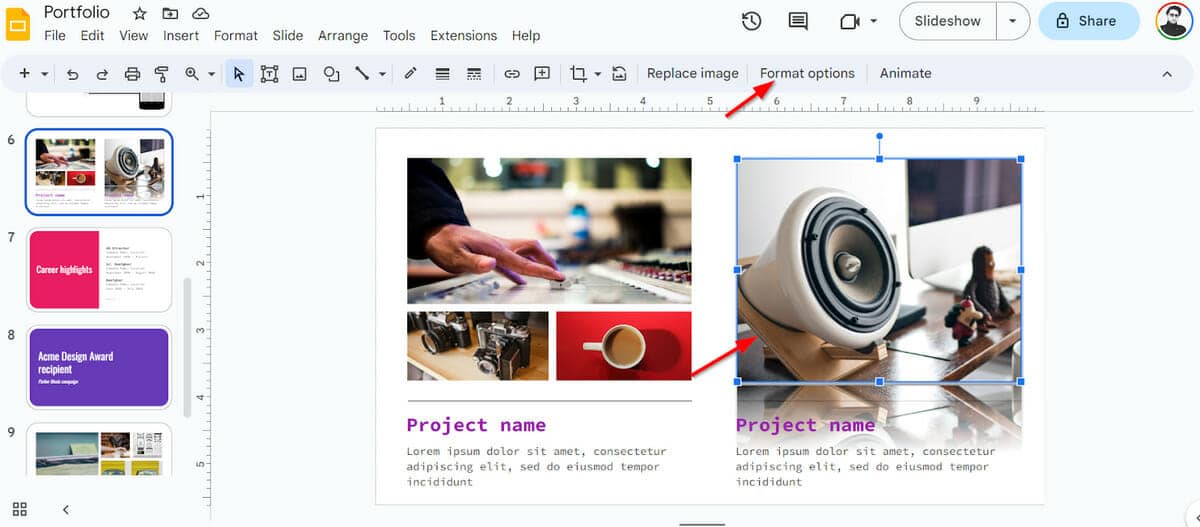
- Use the slider in the “Adjustments” tab to edit the appearance of your image. Moving the “opacity” slider to the left will make the image more transparent. Once you’re content with the level of transparency, click on the “Apply” button.
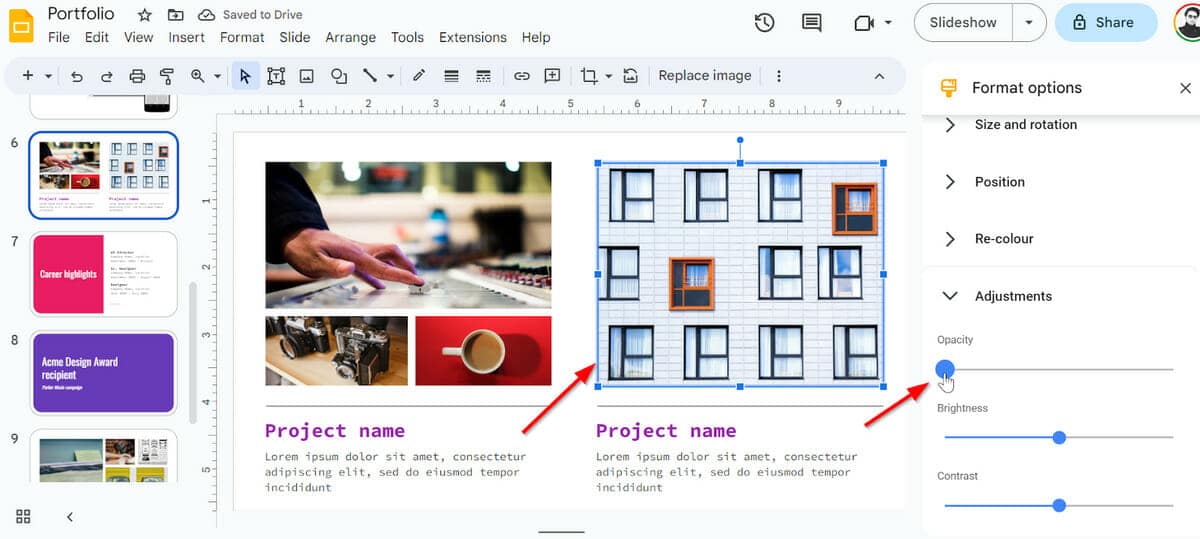
That’s all! You’ve successfully altered your image’s transparency in Google Slides.
How to Change the Transparency of Text in Google Slides
Changing text transparency is the same as changing the transparency of a shape. Follow the steps listed below to easily change the transparency of text in Google Slides:
- From the toolbar, click on “Insert” and “WordArt.”
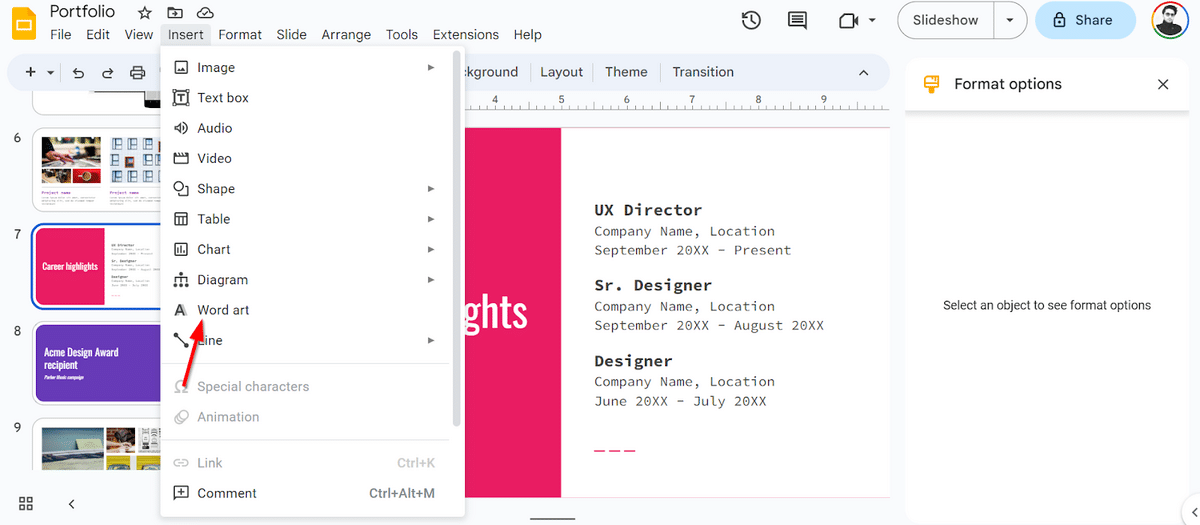
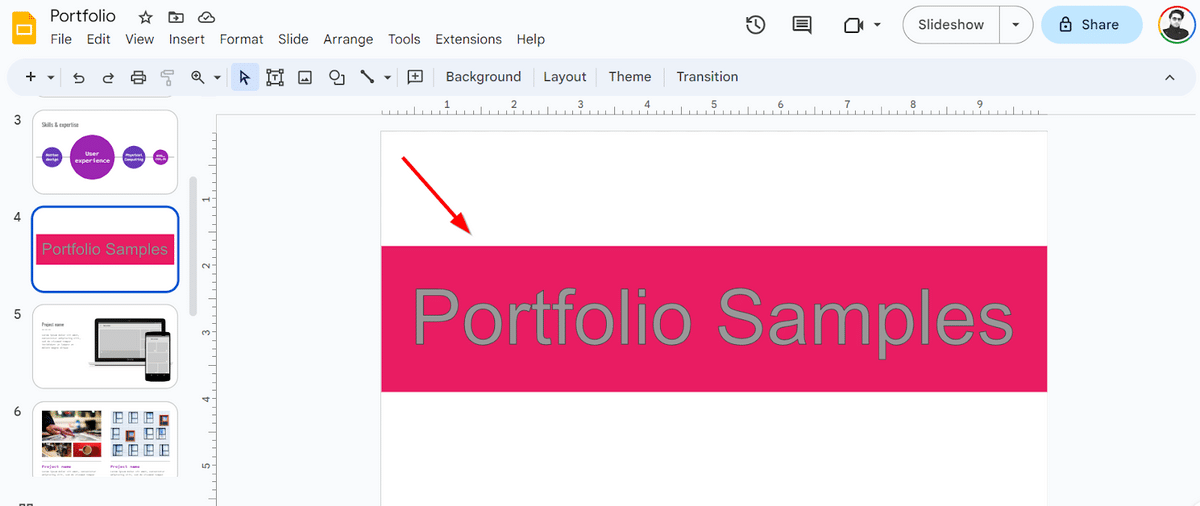
- Type in the text you want to use.
- To make the text transparent, select the text and click on the “Paint bucket” icon to pull up the transparency setting. Then, move the “transparency” slider to the left to choose your desired selection.
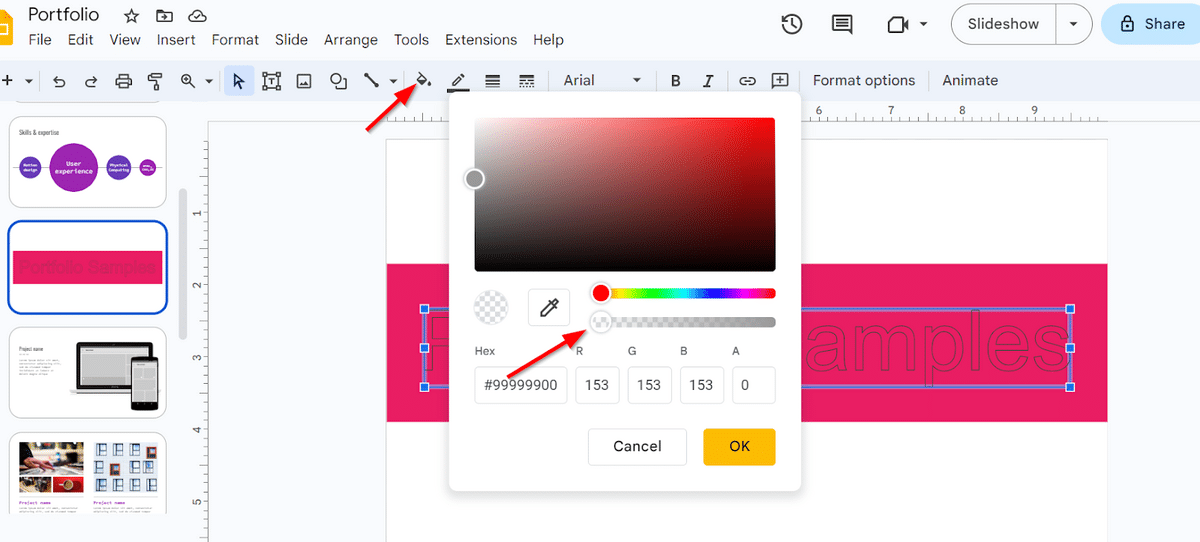
This is what the final result should look like:
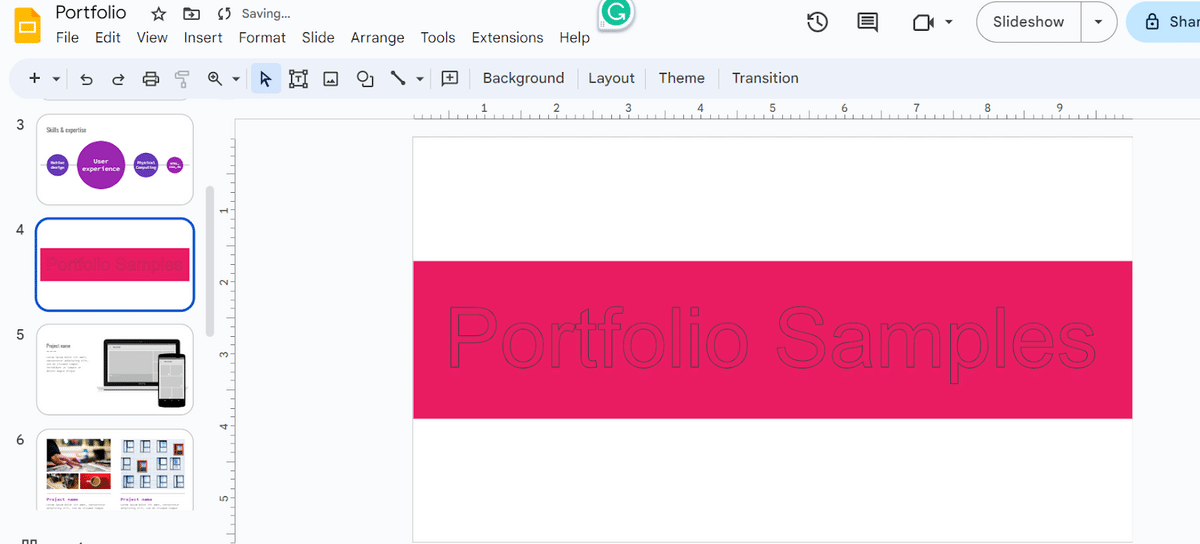
You have now successfully changed the opacity of text using Google Slides !
Are There Other Ways to Make My Google Slides Presentation Stand Out?
If you’re looking for other ways to make your Slides presentation stand out for the right reasons, here are two ideas:
Gifs can be a great way to add life to your Slides presentation. Check out how to add GIFs to Google Slides .
Google Sheets Tables
Adding Google Sheets data to your Google Slides presentation is another great way to demonstrate statistical data (or any other type of data that is better understood in this format).
Frequently Asked Questions
Can images be semi-transparent in google slides.
Yes. In Google Slides, images can be semi-transparent (and even completely transparent!). Open the Format Options panel by clicking on the image. Open the Adjustments option in the panel, then increase/decrease the transparency of the image by moving the slider to the left or right.
Can I Copy & Paste a Shape to Another Slide?
Yes, you can paste a shape from one slide to another in Google Slides. Click the shape, then select “Copy” from the “Edit” menu ( “CTRL + C” on Windows/ “CMD + C” on macOS ). Select paste from the menu that appears when right-clicking on a blank area on another slide. You can also use “CTRL + V” on Windows or “CMD + V” on macOS to paste the shape. The same procedure applies to text boxes and images that are copied and pasted.
In addition to providing brief explanations, most businesses prefer to give well-designed presentations that fully illustrate project concepts.
Depending on a platform’s capabilities, including high-quality images can increase the reception of your presentation. We sincerely hope that this article has helped you understand how to make a shape transparent in Google Slides!
To help you gain a professional edge in your daily life, be sure to check out these amazing GSuite courses !
- How to Change Slide Size in Google Slides [Easy Guide]
- How to Add a Video to Google Slides [Complete Guide]
- How to Make Google Slides Play Automatically
Most Popular Posts


How To Highlight Duplicates in Google Sheets

How to Make Multiple Selection Drop-Down Lists in Google Sheets

Google Sheets Currency Conversion: The Easy Method

How To Apply a Formula to an Entire Column in Google Sheets
Related posts.
- Sumit Bansal
- November 19, 2024
Excel’s New Function: A Game Changer for Running Totals
- November 18, 2024
The 2 Most Helpful Personal Finance Formulas in Excel
- November 11, 2024
Spreadsheets or Databases? The Wrong Choice Could Hurt Your Business
- Princess Angolluan
- November 6, 2024
Thanks for visiting! We’re happy to answer your spreadsheet questions. We specialize in formulas for Google Sheets, our own spreadsheet templates, and time-saving Excel tips.
Note that we’re supported by our audience. When you purchase through links on our site, we may earn commission at no extra cost to you.
Like what we do? Share this article!

- PC & Mobile
- Google Slides
How to Make a Shape Transparent in Google Slides
Dominic Anderson As a content marketer by day and tech enthusiast by night (and some of the day too), I share my thoughts about new platforms and fixes for the problems I’ve encountered with the technology I use. Read more March 22, 2023
Google Slides has an amazing feature that allows users to easily insert, edit, and manipulate shapes in their slides. One of the best ways this can be done is by making a shape transparent and providing the perfect graphic to whichever slide you are trying to build.
Users can use shapes for various design elements, including the framing of text or images. This would be a prime reason to render a shape either fully transparent or semi-transparent on the slide. If you’re looking for how to make a shape transparent in Google Slides, this is where you need to be.
Turning a Shape Transparent
Unfortunately, no easy shortcut or hotkey will turn a shape transparent in Google Slides. Knowing the full steps of the process will be the only way in which you can achieve the effect you want. Thankfully, Google has made the task very straightforward and quick to do.

The above feature is an on-off setting for making shapes in Google Slides transparent. However, this is not the only transparency setting available to you.
Google Slides Turn a Shape Semi-Transparent
Rendering a fully transparent shape can be useful and exactly what’s needed in the slide design. However, there are times when you may need a more advanced tool to add additional customization. This is when making a shape semi-transparent could easily work for you.

Your shape will now look semi-transparent, and the slider in the settings will allow you to change it as much as you need for your design.
Turn a Shape Semi-Transparent With a Color Gradient
In addition to simply making a shape transparent or semi-transparent, Google Slides also allows you to make a shape transparent along a color gradient.

This process will give your shape a semi-transparent color instead of giving your image a fully transparent look. This is an excellent option for editing shapes to fit a set presentation theme.
Additional FAQs
Can you make an image transparent in google slides.
Yes, just as with a shape, you can make an image transparent in Google slides. The process is similar to how you handle making a shape transparent.
1. Click on the picture you want to edit.
2. In the toolbar of Google Slides, click “Format Options.”
3. Click “Adjustments” in the menu.
4. Navigate to the transparency option and use the slider to adjust the image.
Making an image transparent in Google slides is a simple way to enhance an image without first requiring a user to change a picture in editing software.
Can I make a shape from a pre-made Google Slides template transparent?
Yes, once you have picked and loaded a Google Slides template into the presentation you want to work on, you can edit any template element to suit your presentation. This includes changing the shapes to be transparent.
Google Slides – Fully Transparent
Google Slides provides a fast and easy way to make shapes transparent, letting you set up your design as quickly as possible without sacrificing your vision of the presentation. After all, the visuals are half the battle!
Have you used or planned to use transparent shapes in Google Slides? Let us know in the comments below!
Related Posts

Was this page helpful?
Disclaimer: Some pages on this site may include an affiliate link. This does not effect our editorial in any way.
Dominic Anderson September 29, 2023
Dominic Anderson September 27, 2023

Dominic Anderson September 14, 2023
Send To Someone
Missing device.
Please enable JavaScript to submit this form.
Creating Transparent Shapes in Google Slides for Better Presentations
Creating transparent shapes in Google Slides can take your presentation game to the next level. It’s an easy way to add a touch of professionalism and keep your audience engaged. All you need is a few clicks to achieve a sleek, modern look that makes your slides stand out. Let’s jump right in and learn how to do it.
Step by Step Tutorial: Creating Transparent Shapes in Google Slides
Before we dive into the steps, it’s important to understand what we’re aiming for. Adding transparent shapes can highlight key points, create visual interest, and make text easier to read over busy backgrounds. Now, let’s get started!
Step 1: Open Your Google Slides Presentation
Open the Google Slides presentation where you want to add a transparent shape.
Remember that you’ll need internet access and a Google account to use Google Slides. If you’re working on a shared presentation, make sure you have editing permissions.
Step 2: Insert a Shape
Click on the ‘Insert’ menu, then select ‘Shape’ and choose the shape you’d like to add to your slide.
There’s a variety of shapes to choose from, such as rectangles, circles, or arrows. Think about what shape will best complement the information on your slide.
Step 3: Adjust the Shape’s Size and Position
Click and drag the corners of the shape to resize it, and drag the shape to where you want it on the slide.
Be mindful of the slide’s layout and don’t block any essential text or images. The goal is to enhance your slide, not clutter it.
Step 4: Change the Shape’s Fill Color
With the shape selected, click on the ‘Fill color’ tool in the toolbar and choose the color you want for your shape.
If you’re placing text over the shape, choose a color that ensures the text remains legible. You can also use your company or brand colors for consistency.
Step 5: Adjust the Transparency
In the ‘Fill color’ menu, click on ‘Custom’ and use the transparency slider to adjust the shape’s transparency.
This is where the magic happens! Sliding towards the right will make the shape more transparent. Play around with the transparency until you get the desired effect.
After completing these steps, you’ll have a beautifully transparent shape on your slide that adds visual interest and helps underscore important points.
Tips for Creating Transparent Shapes in Google Slides
- Choose a shape that complements the content of your slide; it should enhance, not distract.
- Use brand colors for shapes to maintain a consistent and professional look.
- Adjust the shape’s transparency based on the slide’s background; busier backgrounds might require more transparency.
- If you’re layering text on the transparent shape, ensure the text is easily readable by adjusting the shape’s color and transparency accordingly.
- Experiment with different shapes and transparency levels to see what works best for your presentation style.
Frequently Asked Questions
How do i select the right shape for my slide.
The right shape should align with the message of your slide. For instance, use an arrow to point out key information or a circle to highlight a significant figure.
Can I use multiple transparent shapes on one slide?
Absolutely! You can use several shapes as long as they don’t clutter the slide. Remember, less is often more in design.
Is it possible to make images transparent as well?
Yes, you can adjust the transparency of images in Google Slides by using the ‘Format options’ and adjusting the ‘Adjustments’ settings.
Can I apply transparency to text?
Directly, no. But you can create a transparent shape and place your text on top of it for a similar effect.
What should I do if the transparency option is not available?
Make sure you’ve selected a shape or image first. If the issue persists, try reloading the presentation or using a different browser.
- Open your Google Slides presentation.
- Insert a shape from the ‘Insert’ menu.
- Adjust the shape’s size and position on the slide.
- Change the shape’s color using the ‘Fill color’ tool.
- Adjust the shape’s transparency in the ‘Custom’ color settings.
Creating transparent shapes in Google Slides is a nifty trick that can transform your presentations from mundane to extraordinary. Not only does it add a layer of sophistication, but it also helps in directing your audience’s attention to the most crucial parts of your slide. The steps outlined in this article are straightforward and can be executed by anyone, regardless of their technical prowess. Remember, the key to a successful presentation is not just the content but also its delivery and visual appeal. So, go ahead, give it a try, and watch your presentations come alive with a touch of transparency! Further reading on design principles and how they apply to presentations could significantly enhance your skills. Your next presentation could be the one that sets you apart, thanks to the simple addition of transparent shapes in Google Slides.

Kermit Matthews is a freelance writer based in Philadelphia, Pennsylvania with more than a decade of experience writing technology guides. He has a Bachelor’s and Master’s degree in Computer Science and has spent much of his professional career in IT management.
He specializes in writing content about iPhones, Android devices, Microsoft Office, and many other popular applications and devices.
Read his full bio here .
Share this:
- Click to share on Twitter (Opens in new window)
- Click to share on Facebook (Opens in new window)
- Click to email a link to a friend (Opens in new window)
- Click to share on LinkedIn (Opens in new window)
- Click to share on Reddit (Opens in new window)
- Click to share on Pinterest (Opens in new window)
- Click to share on Tumblr (Opens in new window)
Related posts:
- How to Hide a Slide in Google Slides
- How to Increase the Transparency of an Image in Google Slides
- How to Duplicate a Slide on Google Slides
- How to Make a Shape Transparent in Google Slides: A Step-by-Step Guide
- How to Change Slide Dimensions in Google Slides
- How to Delete a Slide on Google Slides
- How to Make a Picture Transparent in Powerpoint 2013
- How to Delete Multiple Slides in Google Slides
- How to Make Columns in Google Slides
- How to Number Slides in Google Slides
- How to Change Font on Google Slides Text Box
- How to Make a Square Picture a Circle in Powerpoint 2013
- Importing Keynote Presentations to Google Slides: A Step-by-Step Guide
- How to Put YouTube Videos in Google Slides
- iPhone Button Shapes: A Comprehensive Guide to Their Design Evolution
- How to Add a Textbox on Google Slides
- How to Insert Videos in Google Docs
- How to make Google Slides automatically transition: A step-by-step guide
- How to Copy Image from Google Slides
- How to Add a Background in Google Docs (An Easy 6 Step Guide)
- Google Slides Tutorials
How to Make a Shape Transparent in Google Slides
Creating stunning presentations is a must if you want to stand out at the racing pace today. Slides, if in school, at the office, or on any project that you are working with, should seem professional yet innovative. One handy trick that’s going to make your presentation pretty is by making a shape transparent in Google Slides. No need to worry-it’s going to be super easy, and you don’t need to be a design expert to do this.
Today, you’re going to learn how to make a shape in Google Slides transparent. And, in the interests of saving you time, let’s get right into it, shall we?
Why Would I Use a Transparent Shape?
You are probably thinking right now, “Why would a shape ever need to be transparent?” Well, there are several reasons why you want to do this easy little trick to take your slides to the next level:
- Layer text over background images: You can apply transparent shapes in order to layer text over text without overlaying an image or design completely.
- Guide audience attention: Use transparent shapes to guide the viewer’s attention to points or aspects that they should pay the most heed to the most important thing.
- Create a professional look: Any degree of transparency will make your slides look sleek and modern.
- Custom Design Elements: Use the transparent shape with images, text, or other design elements and come up with an innovative creative idea for your design.
Since you’re swimming in ideas, let’s see how to do it in a few easy steps.
Step 1: Open Your Google Slides Presentation
- Open up the Google Slides presentation and add a shape to be semi-transparent here, or create a new slide if you just want to try it first.
Step 2: Insert a Shape
- Click up in your top menu and click on “Insert” by opening it down.
- Over “Shape”, click on the best for you, rectangle, circle, or even a much more creative shape you might be able to find there. The shape will automatically appear on your slide.
Step 3: Resize and Move the Shape
Click on the shape to drag and drop or resize it around your slide. Now, using the handles on the edge, drag and resize it to be closer to where you want.
Step 4: Transparency of the Shape
Now it gets fun: making your shape transparent. Here’s how to do this:
- Click on the shape so that it is selected.
- Now go up to the toolbar and select Paint Bucket. This will open a bunch of colors for you.
- Scroll down the color menu then click “Custom”. Now you can see a transparency slider.
- Drag the slider so that you have the shape barely visible or transparent enough to almost make it invisible.
And you get that shape transparent in Google Slides.
Need more possibilities with editing images? Check here to learn how to make images transparent in Google Slides .
If you just don’t have much time or want to get creative without having to do all of the setup work, then check out premade free Google Slides online. These designs are very well done with transparent shapes, images, and text boxes already there for you to use simply as your theme or message to edit. The hard work is done for you with these resources, so no need to reinvent the wheel.
Presentation Hacks
Become a pro on Google Slides? There is much more that can be done to make the creation of fantastic and useful presentations. Here, change the opacity of the objects and layering elements. The list seems endless! Find more from our tips & tricks section on presentation hacks to make your slides look amazing without extra hassle.
One of the supercool, simple yet very powerful tricks you can do in Google Slides is making a shape transparent. It will really make your presentation pop. By drawing attention to the text, creating a lovely background effect, or just messing around with design elements – transparency is one of the fantastic tools in any design kit.
Of course, you do not need to start from scratch, but most of the free Google Slides templates offer all the above and much more. With a few clicks of your mouse, your presentation will surely look professional, modern, and very engaging.
Now that you know how to make any shape transparent in Google Slides. Go ahead, and think of cool stuff!
Spread Love
Related blogs.
Arockia Mary Amutha
Arockia Mary Amutha is a seasoned senior content writer at SlideEgg, bringing over four years of dedicated experience to the field. Her expertise in presentation tools like PowerPoint, Google Slides, and Canva shines through in her clear, concise, and professional writing style. With a passion for crafting engaging and insightful content, she specializes in creating detailed how-to guides, tutorials, and tips on presentation design that resonate with and empower readers.
Recent Blogs

How to Create an Effective Lesson Plan Presentation?
A significant first step towards creating a great lesson plan presentation is vital to any teacher who wants his lesson...

What are the Google Slides Dimensions: A Quick Guide
When designing your presentation in Google Slides, one important factor to consider is the size of your slides. Whether your...

Simple Ways to Present Possible Do’s and Don’ts in Construction Industry
Construction sites are filled with potential hazards, from towering cranes to buzzing power tools. The key to keeping everyone safe?...
SIGNUP FOR NEWSLETTER

IMAGES
VIDEO
COMMENTS
To alter a shape's transparency, select the shape, click the paint bucket icon, press + under Custom, and slide to desired transparency. This adds depth and visual appeal to presentations. Google Slide is becoming a popular way to give presentations. You can use many different features to make your presentation more visually appealing ...
Step 4: Adjust Transparency. In the format options sidebar, click on "Adjustments" and use the "Transparency" slider to set the desired level of transparency. You'll be able to preview the changes in real-time as you move the slider. Choose a percentage that fits your design needs. After completing these steps, your shape will now be ...
Step 3: Adjust the Shape's Transparency. With the shape still selected, click on the "Fill color" icon (a paint bucket) in the toolbar. You'll see a button labeled "Transparent.". Click on this to make the shape transparent.
Step 1: Open your Google Slides presentation. First, you'll need to access your Google Slides presentation where the shape you want to make transparent is located. Once you've opened your presentation, navigate to the slide that contains the shape you wish to modify. If you haven't added a shape yet, simply go to the slide where you want ...
Click to Subscribe: http://bit.ly/19vzAMHIt's possible to create a transparent shape by adjusting its colour preset!
Learn how to adjust the opacity of shapes, images and text in Google Slides to create visually appealing and engaging presentations. Follow the step-by-step guide with screenshots and tips for different elements.
Learn how to use the transparency feature in Google Slides to create professional-looking presentations with transparent shapes, text, and images. Follow the easy steps and see examples of different transparency levels and effects.
Yes, just as with a shape, you can make an image transparent in Google slides. The process is similar to how you handle making a shape transparent. 1. Click on the picture you want to edit. 2. In ...
Summary. Open your Google Slides presentation. Insert a shape from the 'Insert' menu. Adjust the shape's size and position on the slide. Change the shape's color using the 'Fill color' tool. Adjust the shape's transparency in the 'Custom' color settings.
How to Make a Shape Transparent in Google Slides. Step 1: Open Your Google Slides Presentation. Open up the Google Slides presentation and add a shape to be semi-transparent here, or create a new slide if you just want to try it first. Step 2: Insert a Shape. Click up in your top menu and click on "Insert" by opening it down.